Documentation of my experiences and equipment for Microphotography
Last Updated: 7th Dec 2014By Edgar Müller
I have already tried myself as a micromount-photographer in 1980, at the time using a microscope from Euromex with included Phototubus.
For lighting, I have used a 3-armed gooseneck cold-light lamp.
The camera used was an Olympus reflex camera used by many other photographers: the OM2 N.
However, the results of that where so subpar, if not outright horrible, that I had dropped microphotography again rather quickly.
It was around 4 years ago, when my employer bought a Zeiss Discovery V8 equipped with a phototubus and a camera, that the desire to take up microphotography once more took root in me.
Encouraged by the multitude of publications on the topic of multi-level photography, I decided to once again try this type of photography, this time using the aforementioned device owned by my employer. Already, the resulting first photos taken with it came out surprisingly well.
I moved the camera using the fine focus of the microscope and adjusted the stacking intervals purely by gut feeling.
Once I had reached the point where this was no longer sufficient or rather, seemed not precise enough, I went and acquired a gauge capable of measuring in the area of micrometers. After doing so, I could now use it to meter-read the intervals on the gauge, ensuring as precise a stacking interval as I could get without automated settings.

After having started with micro-photography, I found myself dissatisfied with the results of the Zeiss Discovery after only three months of use. It was time to rebuild!
When doing so, I found my previous idea (‘once I reach the age of pension, I will try micromount-photography once more, this time using micro-objectives’) to be of use.
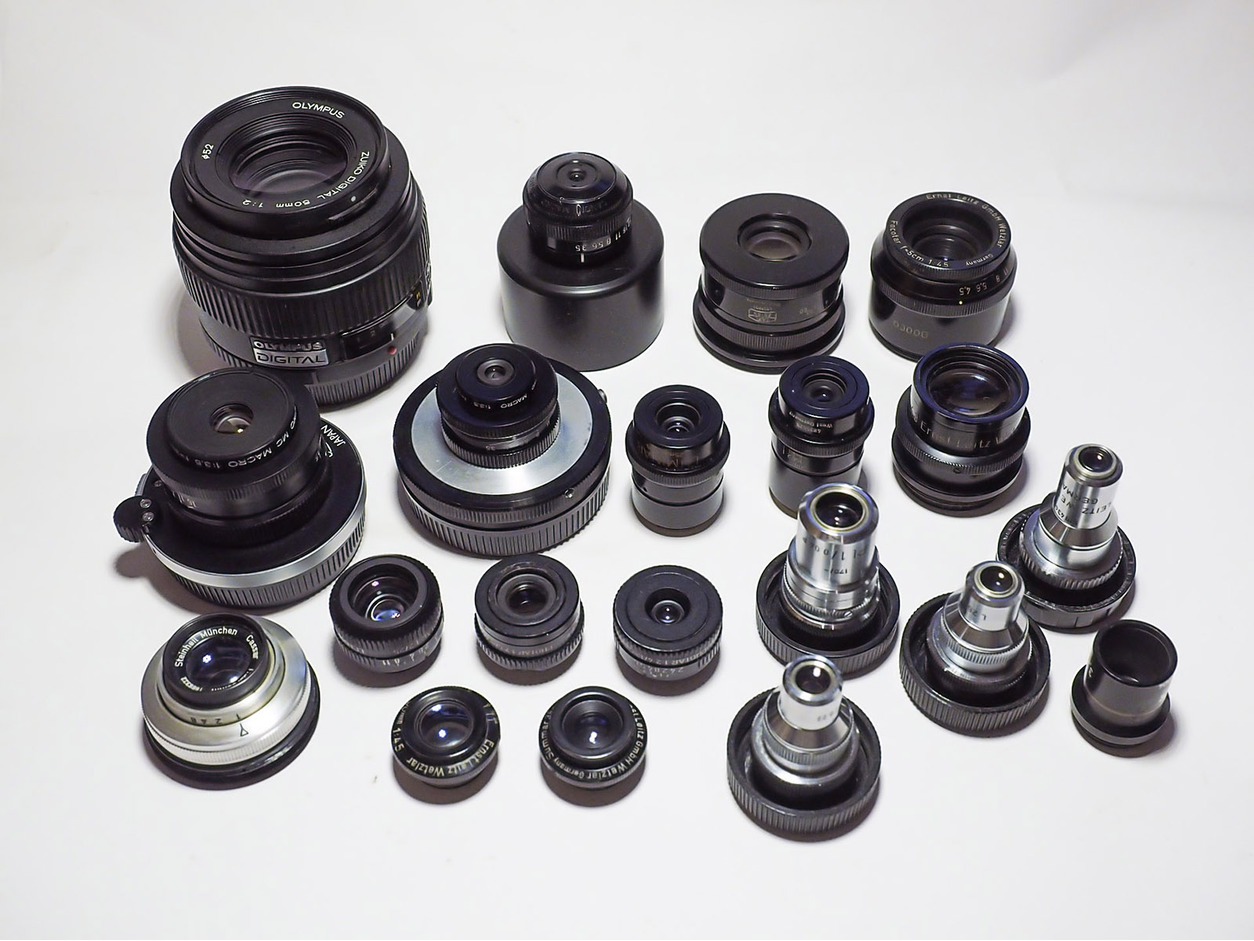
Meanwhile, I have managed to acquire a multitude of objectives. Some of them I managed to get at bargain prices, something which isn’t easily done today.
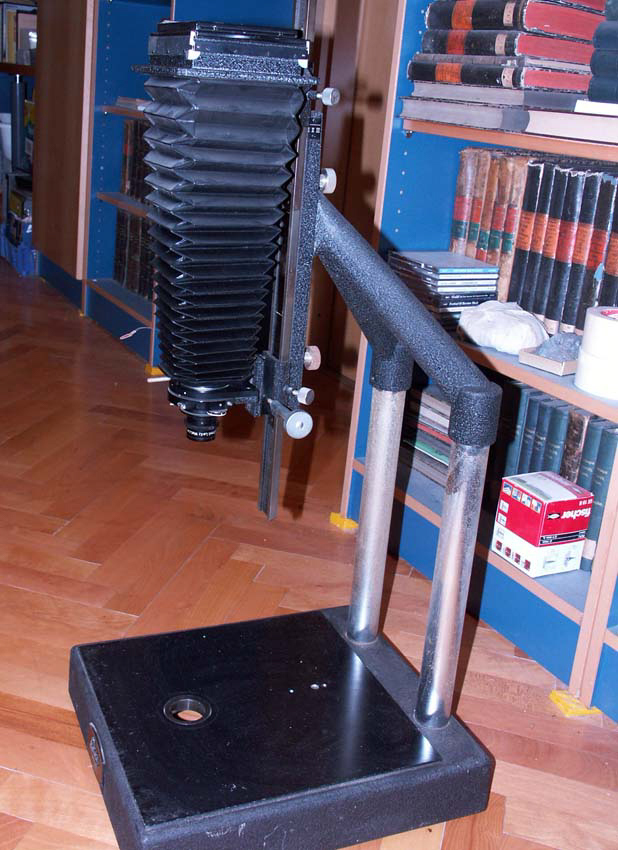
I had assembled almost everything necessary to build me my own equipment:
Pic 1 = An old Leitz-bellows device,
Pic 2 = different objectives
The things I was missing where a number of different adaptors, a digital reflex camera and lighting. Like before, I decided to use an Olympus and bought a used E330. Following that, I tried an E3 and since around a year I have been using a non-reflex camera in the form of an OMD EM1.
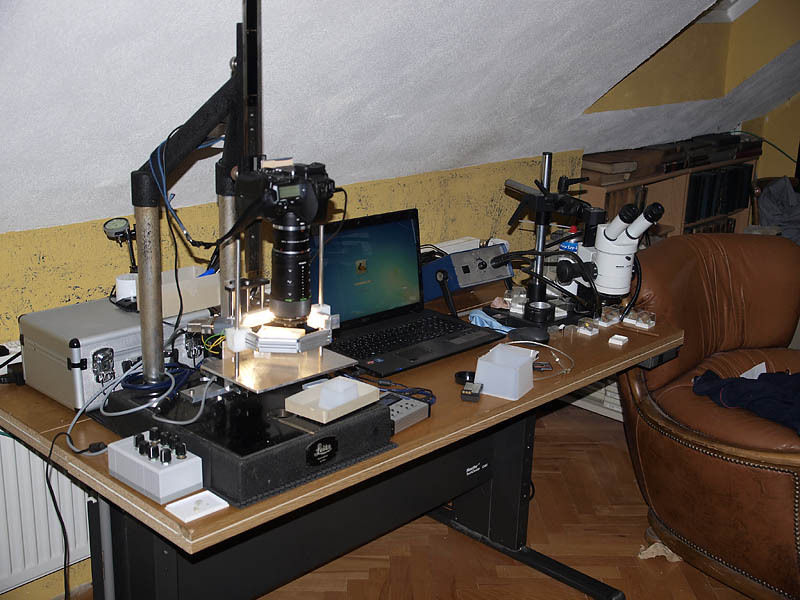
I also decided to go with the times in terms of lighting and went out looking for a ring-style LED lamp. I quickly found out that a direct light from above, like the one from the Schott-LED lamp, wasn’t what I was looking for. The solution to this required some thought and the final result was a self build 8 segment lamp using power LEDs. Said lamp was build to my specifications by an electric engineer of my acquaintance. Each of 8 segments is dimmable. The segments have all been arranged in such a way that they illuminate into the center of the ring, shining sideways. By doing this, my model is not hit by harsh lighting from directly above. On the right and left of the ring, I attached a plastic block into which I drilled an 8 mm hole. By doing so, I merely needed to fixate two 8 mm metal poles on my table onto which I slide my lamp. This allows me to adjust the height of the lamp by simply sliding it up or down as needed.

I later replaced the plastic blocks with aluminum blocks and added locking screws to them in order to keep the lamp in position. I have been using this lamp for my photos almost exclusively since then. To replace the diffusor, I simply use a set of different foils.
A simple 5 mm plate of aluminum, with the lighting system attached, serves as my photography table. This plate has in turn been attached to the main body of an old microscope. Utilizing the fine focus of the microscope, it is possible to adjust the positioning of the plate by a maximum of 2 mm up and down on the vertical scale. Thanks to the fine focus of the microscope, I am able to adjust the positioning very precisely. It was one year after taking up micro-photography and manual adjusting of the stacking intervals.
I decided to perform the first more expensive investment for this hobby: I ordered the Stackshot, including controls, from America. Rebuilding was done quickly and I was soon able to start with automated stacking and photography. This ended up being quite the advantage: while the Stackshot is working, I am capable of editing other photos on the PC or search for other minerals to photograph.

In the meantime, I have been able to come into contact with other photographers and, through that, been able to fix some minor problems I suspect everyone has had to deal with at one time or the other. Something that I was trying to puzzle out for a rather long time was the right stacking interval, or rather: ‘what is the right or optimal stacking interval?’
Following extensive research, both online and through various literatures, I ultimately wrote myself a simple program, which calculates the optimal stacking interval for me, independent from the focal distance. The data necessary to do so are: the focal distance, the diameter of the circle of dispersion and the size of the camera chip.
From the very beginning, when I started taking photos using the Zeiss microscope, I have photographed a micrometer measuring disc after each stack. Using a software from the Zeiss company, I calibrated the picture, allowing me to accurately measure the resulting photo. This means it is no problem at all to measure the width of the picture, the exact size of the crystals or areas and angles!
Another important point is the subject of Oscillations. In the beginning, my photography equipment was placed on my desk. I did, however, place it somewhere else rather quickly.
Today, my equipment is placed on top of a ca. 250 kg heavy concrete base. On top of that is a wooden box, filled with sand. My equipment finally has been aligned on top of this sandy base. Furthermore, for about 2 months now, I have also been using 4 oscillation dampers made from tennis balls. The sand-filled wooden box and my equipment now stand on top of these 4 balls, which in turn stand on top of the concrete base. Through doing this, I have managed to reduce the shock of somebody walking past my equipment or a car driving by my house transmitted to my camera to almost zero.
Another point of critique happened to be the stackshot itself. Although it works fine to this day, it still doesn’t quite satisfy me. I have gotten the feeling that the slide of the stackshot has problems moving smoothly. This feeling got strengthened when I read an article/review by another photographer. He wrote, that he had his Stackshot rebuild and was working with two slides. So I thought about what I could do.
Considering I myself didn’t know anyone who could build me a similar slide, nor someone who could rebuild the stackshot, I decided to search the web and found a developer, who build and sold a slide similar to the one I needed.
After having met him and working together, we ended up developing a complete, self-contained set of stacking equipment:
The "Stacking Unit". This equipment includes:
- LED-Lamp (Based on my own design)
- StackMaster
and and and
To be continued!
Edgar Müller -loparit-
For lighting, I have used a 3-armed gooseneck cold-light lamp.
The camera used was an Olympus reflex camera used by many other photographers: the OM2 N.
However, the results of that where so subpar, if not outright horrible, that I had dropped microphotography again rather quickly.
It was around 4 years ago, when my employer bought a Zeiss Discovery V8 equipped with a phototubus and a camera, that the desire to take up microphotography once more took root in me.
Encouraged by the multitude of publications on the topic of multi-level photography, I decided to once again try this type of photography, this time using the aforementioned device owned by my employer. Already, the resulting first photos taken with it came out surprisingly well.


I moved the camera using the fine focus of the microscope and adjusted the stacking intervals purely by gut feeling.
Once I had reached the point where this was no longer sufficient or rather, seemed not precise enough, I went and acquired a gauge capable of measuring in the area of micrometers. After doing so, I could now use it to meter-read the intervals on the gauge, ensuring as precise a stacking interval as I could get without automated settings.
Zeiss Discovery V8
After having started with micro-photography, I found myself dissatisfied with the results of the Zeiss Discovery after only three months of use. It was time to rebuild!
When doing so, I found my previous idea (‘once I reach the age of pension, I will try micromount-photography once more, this time using micro-objectives’) to be of use.
Meanwhile, I have managed to acquire a multitude of objectives. Some of them I managed to get at bargain prices, something which isn’t easily done today.
I had assembled almost everything necessary to build me my own equipment:
Pic 1 = An old Leitz-bellows device,
Pic 2 = different objectives

The things I was missing where a number of different adaptors, a digital reflex camera and lighting. Like before, I decided to use an Olympus and bought a used E330. Following that, I tried an E3 and since around a year I have been using a non-reflex camera in the form of an OMD EM1.
I also decided to go with the times in terms of lighting and went out looking for a ring-style LED lamp. I quickly found out that a direct light from above, like the one from the Schott-LED lamp, wasn’t what I was looking for. The solution to this required some thought and the final result was a self build 8 segment lamp using power LEDs. Said lamp was build to my specifications by an electric engineer of my acquaintance. Each of 8 segments is dimmable. The segments have all been arranged in such a way that they illuminate into the center of the ring, shining sideways. By doing this, my model is not hit by harsh lighting from directly above. On the right and left of the ring, I attached a plastic block into which I drilled an 8 mm hole. By doing so, I merely needed to fixate two 8 mm metal poles on my table onto which I slide my lamp. This allows me to adjust the height of the lamp by simply sliding it up or down as needed.
Self made LED lamp
I later replaced the plastic blocks with aluminum blocks and added locking screws to them in order to keep the lamp in position. I have been using this lamp for my photos almost exclusively since then. To replace the diffusor, I simply use a set of different foils.
A simple 5 mm plate of aluminum, with the lighting system attached, serves as my photography table. This plate has in turn been attached to the main body of an old microscope. Utilizing the fine focus of the microscope, it is possible to adjust the positioning of the plate by a maximum of 2 mm up and down on the vertical scale. Thanks to the fine focus of the microscope, I am able to adjust the positioning very precisely. It was one year after taking up micro-photography and manual adjusting of the stacking intervals.
I decided to perform the first more expensive investment for this hobby: I ordered the Stackshot, including controls, from America. Rebuilding was done quickly and I was soon able to start with automated stacking and photography. This ended up being quite the advantage: while the Stackshot is working, I am capable of editing other photos on the PC or search for other minerals to photograph.
LED Lamp, Table, StackShot
In the meantime, I have been able to come into contact with other photographers and, through that, been able to fix some minor problems I suspect everyone has had to deal with at one time or the other. Something that I was trying to puzzle out for a rather long time was the right stacking interval, or rather: ‘what is the right or optimal stacking interval?’
Following extensive research, both online and through various literatures, I ultimately wrote myself a simple program, which calculates the optimal stacking interval for me, independent from the focal distance. The data necessary to do so are: the focal distance, the diameter of the circle of dispersion and the size of the camera chip.
From the very beginning, when I started taking photos using the Zeiss microscope, I have photographed a micrometer measuring disc after each stack. Using a software from the Zeiss company, I calibrated the picture, allowing me to accurately measure the resulting photo. This means it is no problem at all to measure the width of the picture, the exact size of the crystals or areas and angles!
Another important point is the subject of Oscillations. In the beginning, my photography equipment was placed on my desk. I did, however, place it somewhere else rather quickly.
Leitz Bellow mit LED LAMP
Today, my equipment is placed on top of a ca. 250 kg heavy concrete base. On top of that is a wooden box, filled with sand. My equipment finally has been aligned on top of this sandy base. Furthermore, for about 2 months now, I have also been using 4 oscillation dampers made from tennis balls. The sand-filled wooden box and my equipment now stand on top of these 4 balls, which in turn stand on top of the concrete base. Through doing this, I have managed to reduce the shock of somebody walking past my equipment or a car driving by my house transmitted to my camera to almost zero.
Another point of critique happened to be the stackshot itself. Although it works fine to this day, it still doesn’t quite satisfy me. I have gotten the feeling that the slide of the stackshot has problems moving smoothly. This feeling got strengthened when I read an article/review by another photographer. He wrote, that he had his Stackshot rebuild and was working with two slides. So I thought about what I could do.
Considering I myself didn’t know anyone who could build me a similar slide, nor someone who could rebuild the stackshot, I decided to search the web and found a developer, who build and sold a slide similar to the one I needed.
After having met him and working together, we ended up developing a complete, self-contained set of stacking equipment:
The "Stacking Unit". This equipment includes:
- LED-Lamp (Based on my own design)
- StackMaster
and and and


To be continued!
Edgar Müller -loparit-
Article has been viewed at least 9576 times.