Home PageAbout MindatThe Mindat ManualHistory of MindatCopyright StatusWho We AreContact UsAdvertise on Mindat
Donate to MindatCorporate SponsorshipSponsor a PageSponsored PagesMindat AdvertisersAdvertise on Mindat
Learning CenterWhat is a mineral?The most common minerals on earthInformation for EducatorsMindat ArticlesThe ElementsThe Rock H. Currier Digital LibraryGeologic Time
Minerals by PropertiesMinerals by ChemistryAdvanced Locality SearchRandom MineralRandom LocalitySearch by minIDLocalities Near MeSearch ArticlesSearch GlossaryMore Search Options
The Mindat ManualAdd a New PhotoRate PhotosLocality Edit ReportCoordinate Completion ReportAdd Glossary Item
Mining CompaniesStatisticsUsersMineral MuseumsClubs & OrganizationsMineral Shows & EventsThe Mindat DirectoryDevice SettingsThe Mineral Quiz
Photo SearchPhoto GalleriesSearch by ColorNew Photos TodayNew Photos YesterdayMembers' Photo GalleriesPast Photo of the Day GalleryPhotography
╳Discussions
💬 Home🔎 Search📅 LatestGroups
EducationOpen discussion area.Fakes & FraudsOpen discussion area.Field CollectingOpen discussion area.FossilsOpen discussion area.Gems and GemologyOpen discussion area.GeneralOpen discussion area.How to ContributeOpen discussion area.Identity HelpOpen discussion area.Improving Mindat.orgOpen discussion area.LocalitiesOpen discussion area.Lost and Stolen SpecimensOpen discussion area.MarketplaceOpen discussion area.MeteoritesOpen discussion area.Mindat ProductsOpen discussion area.Mineral ExchangesOpen discussion area.Mineral PhotographyOpen discussion area.Mineral ShowsOpen discussion area.Mineralogical ClassificationOpen discussion area.Mineralogy CourseOpen discussion area.MineralsOpen discussion area.Minerals and MuseumsOpen discussion area.PhotosOpen discussion area.Techniques for CollectorsOpen discussion area.The Rock H. Currier Digital LibraryOpen discussion area.UV MineralsOpen discussion area.Recent Images in Discussions


Mineral PhotographyCapturing fluorescent minerals?

7th Jun 2012 18:47 UTCTim Jokela Jr
Filters? Process?
I'll be using a SuperBright SW UV and a Canon 7D.
Many thanks!
7th Jun 2012 21:08 UTCJeff Weissman Expert
I have had good experience with about 2-15 second exposure, lens wide-open, and with a strong UV-filter. Keep the lamp behind the lens or shileded from the lens, make sure the filter and the lens do not fluoresce, and watch out for fluorescent dust, backgrounds, etc. Best to use a non-fluorescent background that will appear black in the image. Sometimes extensive color correction, to remove the purple cast in the image, is required as part of post processing. For larger specimens, I hand-hold the lamp and wave it about to get even coverage on the specimen.
Good luck!

7th Jun 2012 23:13 UTCHarold Moritz 🌟 Expert
Initial photos always come out too blue and that must be removed in photoshop (if any one knows a filter for this please chime in). Best to have the specimen under the UV light next to the computer as a visual reference while adjusting the color balance of the digital image. Do not overexpose or the colors will be saturated leading to poor image and difficulty correcting color.
Once you get the process down you'll love the results.
8th Jun 2012 13:56 UTCEarl Verbeek Expert
I too shoot at f11 or so for most specimens (cabinet size) and let the camera decide the exposure time. However, if you are shooting against a black background you'll need to underexpose the entire image or the specimen itself will be overexposed (unless your camera uses a spot meter or center-weighted exposure system). I usually set the camera to underexpose the image by 2 or 3 f-stops and work up from there. Easy to do with digital.
The problem of dust when shooting under LW ultraviolet light is not easy to eliminate completely. For massive specimens I usually wash them under water and scrub them with a soft toothbrush,to remove any dust. If you let the specimens air-dry they will pick up dust again -- it will adhere to the moist surfaces -- so it's best to blot-dry the specimen with a dark towel, one that you know does not fluoresce, or does so only minimally. When taking a long exposure, 10 seconds or more, I keep blowing on the specimen to keep dust particles in the air so they won't register on the image.
I often prefer to shoot against a black background because this is how most of us are used to viewing fluorescent minerals in displays, where they are resting on black cloth, or wood that has been spray-painted black. That works, however, only for those specimens that have no "dead areas" that don't fluoresce. The majority of fluorescent specimens have areas that fluoresce and others that don't, so if you photograph these against a black background you will "lose" the margins of the specimen and have an image of colored patches of light seemingly floating in space. Such photos are almost useless. Thus a dimly fluorescing background is desirable. You have to experiment there, with sheets of colored paper (sold by art establishments as "railroad board").
What I am looking for now is a uniform source of light, something like a small light table, but with a dimmable light source. With such a device, if it exists (or can be built), one could place colored sheets of transparent plastic on the light box, set the light to any desired level of brightness, and position it beneath a frosted sheet of plexiglass, upon which rests the specimen to be photographed. I tried this with a portable light box I already had, but that box uses only two fluorescent tubes and the light is not uniform. Anyone have any suggestions?
9th Jun 2012 04:57 UTCTim Jokela Jr
Now I know what to ask for at the camera store; previous attempts to explain what I was up to had them thinking I was insane.
Many thanks!

14th Jun 2012 00:57 UTCPaul Brandes 🌟 Manager
"You want to take photos of what??? :-D
8th May 2014 12:38 UTCJohan Ingles - Le Nobel
"Initial photos always come out too blue and that must be removed in photoshop (if any one knows a filter for this please chime in). "
I suspect that the minerals that you're imaging Harold give off visible fluorescence when stimulated by UVC or UVB, in which case this won't be any use, but I'm having success in preventing colour casts by using a Baader-U Venus filter over a MTE UV301 torch. So what's going on there is the MTE UV301 torch emits 365-450nm (the 365nm element is fine to set off the fluorescence in my flowers), but by having the Baader-U filter over the torch this cuts away anything outside the 300-400nm range. So you get something that's 365-400 only and none of the visible blues/purples from 400-450nm that would overwhelm the fluorescence if left in.
On another note I don't know if it's of interest maybe to Earl, but a dimmable light table can just be a small field monitor connected to a PC showing a photoshop colour. You can vary the colour and brightness which dims and brightens the light output. Then have that field monitor shining from below, used just as the light, onto some diffuser (non shiny plastic works for me as it doesn't itself fluoresce). I use something similar for macro. If this makes no sense then this page and this pic probably explain it better.

8th May 2014 17:52 UTCVandall Thomas King Manager

18th May 2014 12:18 UTCJosé Zendrera 🌟 Manager

- Dark working area free of other fluorescent materials.
- Use a very stable small tripod.
- Shot with timer delay.
- Put white balance in flash position if the fluorescence is redish or in incandescent position if the fluorescence is bluish.
- Adjust manual focusing before turn off the light.
- Camera mode: aperture prority closed to 8 (for wider depth of field).
- Use filtered UV source with narrow wavelength range.
- Do not over-expose, try to capture just as your eyes can see.
- Do minimum digital adjustment.
- Shot some pics with UV source at different positions and choose the best.
Can see my fluorescence photos here: http://www.mindat.org/user-22879.html#2_0_0_0_0_2_UV
Sodalite (Var: Hackmanite), Richterite
Richterite occurrence, Ladjuar Medam, Sar-e Sang, Koksha Valley, Khash & Kuran Wa Munjan Districts, Badakhshan Province, Afghanistan
10 x 7 x 5 cm
Hackmanite trapezohedron modified by rhombohedron and prismatic richterite on dolomitic matrix.
1 - Halogen light
2 - UVA
3 - UVC
4 - Phosphorescence
For bigger image and individual photos please see: http://www.mindat.org/photo-614157.html
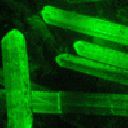
Fluorapatite, Elbaite, Muscovite, Quartz
Stak Nala, Haramosh Mts., Skardu District, Baltistan, Gilgit-Baltistan (Northern Areas), Pakistan
8 x 7 x 6 cm
Mica wall between assorted crystals: quartz, fluorapatite, tourmaline, microcline...
Photo taken under SW-UV light (filtered).
8 x 7 x 6 cm
This Photo was Mindat.org Photo of the Day - 13th Sep 2013

Please see http://www.mindat.org/photo-525149.html for bigger image
17th Jul 2014 21:51 UTCZbynek Burival Expert
The key to success is very good filter removing visible light from your UV lamp, otherwise you get all those blue or purple casts and hues. Most of cheap junk UV sources are useless because of serious visible light emission.
I wrote some pretty detailed tutorial including pictures here http://photographingminerals.com/photographing-uv-minerals.php
6th Jul 2016 22:41 UTCMark Cole

(and some well-shot pics too).
(Esperite, calcite, willemite - Franklin, NJ)


Mindat.org is an outreach project of the Hudson Institute of Mineralogy, a 501(c)(3) not-for-profit organization.
Copyright © mindat.org and the Hudson Institute of Mineralogy 1993-2024, except where stated. Most political location boundaries are © OpenStreetMap contributors. Mindat.org relies on the contributions of thousands of members and supporters. Founded in 2000 by Jolyon Ralph.
Privacy Policy - Terms & Conditions - Contact Us / DMCA issues - Report a bug/vulnerability Current server date and time: April 24, 2024 17:57:15