Home PageAbout MindatThe Mindat ManualHistory of MindatCopyright StatusWho We AreContact UsAdvertise on Mindat
Donate to MindatCorporate SponsorshipSponsor a PageSponsored PagesMindat AdvertisersAdvertise on Mindat
Learning CenterWhat is a mineral?The most common minerals on earthInformation for EducatorsMindat ArticlesThe ElementsThe Rock H. Currier Digital LibraryGeologic Time
Minerals by PropertiesMinerals by ChemistryAdvanced Locality SearchRandom MineralRandom LocalitySearch by minIDLocalities Near MeSearch ArticlesSearch GlossaryMore Search Options
The Mindat ManualAdd a New PhotoRate PhotosLocality Edit ReportCoordinate Completion ReportAdd Glossary Item
Mining CompaniesStatisticsUsersMineral MuseumsClubs & OrganizationsMineral Shows & EventsThe Mindat DirectoryDevice SettingsThe Mineral Quiz
Photo SearchPhoto GalleriesSearch by ColorNew Photos TodayNew Photos YesterdayMembers' Photo GalleriesPast Photo of the Day GalleryPhotography
╳Discussions
💬 Home🔎 Search📅 LatestGroups
EducationOpen discussion area.Fakes & FraudsOpen discussion area.Field CollectingOpen discussion area.FossilsOpen discussion area.Gems and GemologyOpen discussion area.GeneralOpen discussion area.How to ContributeOpen discussion area.Identity HelpOpen discussion area.Improving Mindat.orgOpen discussion area.LocalitiesOpen discussion area.Lost and Stolen SpecimensOpen discussion area.MarketplaceOpen discussion area.MeteoritesOpen discussion area.Mindat ProductsOpen discussion area.Mineral ExchangesOpen discussion area.Mineral PhotographyOpen discussion area.Mineral ShowsOpen discussion area.Mineralogical ClassificationOpen discussion area.Mineralogy CourseOpen discussion area.MineralsOpen discussion area.Minerals and MuseumsOpen discussion area.PhotosOpen discussion area.Techniques for CollectorsOpen discussion area.The Rock H. Currier Digital LibraryOpen discussion area.UV MineralsOpen discussion area.Recent Images in Discussions


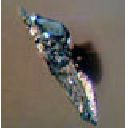
Mineral Photographyusing immersion to photograph inclusions in rough crystals

25th Sep 2015 19:10 UTCDennis McCoy

this first one is a simple stack of 2 photos
in this one you can see some small bubbles held by surface tension. Each one reflects a tiny image of the light ring.


25th Sep 2015 20:35 UTCOwen Melfyn Lewis
A couple of things you might like to try:
- Use isopropyl alcohol rather than water as your immersion fluid. Higher refractive index and will eliminate/much reduce bubble formation and reduce unwanted reflections more than does water.
- Replace your china pot with a cut-down dixie cup. Place the dixie cup on a small low voltage light table (cost about 20-25 bucks) use that as your main light. In general, transmitted/side-lighting works best for illuminating inclusions in crystals. The translucent white of the thin dixie cup improves the diffusion of the light from your light table (that should already be fitted with a partially effective diffusing screen).
- Work on critically sharp focusing and also try increasing the number of shots in your stacks.
26th Sep 2015 01:53 UTCDennis McCoy
26th Sep 2015 03:49 UTCJames Pool

You may have to adjust the curve of the broom clip to assure of a secure firm grip of the usb microscope. A standard hardware store should carry these clips. Lacking thread holes you could either glue a correctly sided nut with a shim for proper fit or a temporary setup with shims and rubber bands or plastic tie clips.
27th Sep 2015 04:18 UTCDennis McCoy
27th Sep 2015 08:30 UTCOwen Melfyn Lewis
Working with a camera and with some cropping of the image file, I find I can make decent images that have about a 1 cm FOV.


Mindat.org is an outreach project of the Hudson Institute of Mineralogy, a 501(c)(3) not-for-profit organization.
Copyright © mindat.org and the Hudson Institute of Mineralogy 1993-2024, except where stated. Most political location boundaries are © OpenStreetMap contributors. Mindat.org relies on the contributions of thousands of members and supporters. Founded in 2000 by Jolyon Ralph.
Privacy Policy - Terms & Conditions - Contact Us / DMCA issues - Report a bug/vulnerability Current server date and time: May 9, 2024 20:13:45