Beginning Guide to Mineral Collecting
Last Updated: 21st Jan 2013By Michael Adamowicz
Beginning Guide to Mineral Collecting
How to begin your Rockhounding hobby.
By: Michal Adamowicz, Rockhound
I thought it would be a good idea to write a beginners guide into the hobby of mineral collecting, or Rockhounding. I know that when you want to begin a new hobby it can be hard to understand how to begin, what to get, how to do it, & where to go. I hope this guide will be a good bit of help to any aspiring rockhounds & provide new info to existing rockhounds.
There are a lot of reasons that you may be interested in mineral collecting. You might want to have an activity that allows you to explore the outdoors, or to explore the mining history of your home, or maybe you want to find nice mineral samples. It could also be that you want to sell what you find & make a living from this, also you want to tough it out & have a challenge, or just to relax in the outdoors. Your reasons for minerals collecting can also be a mix of the above, it usually is. I will write this in sections as it will be much easier to follow.
Step 1: Research
Ok so you want to look for minerals, what do you do first?
Before you even consider buying any equipment you must to research. Research, Research, Research, these three not so simple words are the beginning of any hobby & you will use them continuously as you collect minerals.
Well to begin, it’s a good idea to research the area around your home, to look for mineral locations. Try to read a bit about the geology of your surrounding area, this can give you a good idea of what minerals are located around you. If you find that there is not much collecting potential around your immediate area try to expand your search. Since I mainly collect in the Bancroft area of Ontario, Canada I will refer to this area in most of my examples. I live right now in Mississauga, Ontario & if I research the geology of the surrounding area I will find mostly limestone & the Niagara escarpment, not too much collecting potential. So to find better locations I would expand my search by searching for say “Mineral Collecting in Ontario’. This way I will get websites with collecting in around Ontario, this way I can find an area that a lot of minerals occur. In my search I would find the town of Bancroft, & after a bit of reading about it I would discover that the area surrounding it is rich in minerals. You can use both Google & Yahoo, they are both equally good search engines. Another good idea is to join a mineral club, look around your area you might find one. They can be a wealth of info on locations especially close to home. Also joining a club might give you access to locations that solitary collectors can’t get access. Just so you know there are very few sites that lone collectors have trouble accessing, & they are most operational mines & quarries.
Here are good research tools:
- search your area in Google/Yahoo or other search engine. If your don’t find anything local try to widen your search by
searching your state or province. For Example: “Mineral Collecting locations, Texas” or “ Mineral collecting
locations, Ontario”. Widen your search parameters & use different words in the search engine to clarify your search.
- Join a mineral club in your area, they can give a great hand in beginning collecting in your area.
- Look for stores in your area that sell minerals & fossils, there is a good chance that someone there might have info on a
good mineral region around you. Also metaphysical store tend to sell crystals, they might know something.
- After you find a location, search the internet, library, online bookstore (Amazon, Ebay) for books related to the location.
Step 2: Research site/area & get directions
So now you have done a bit of research, so hopefully you have located an area near you. So what’s the next step? A good idea would be to get driving directions to the area, so you have a feel if you want to travel to the area. If you can make the journey, then more research is in order. You best bet is to use Google Maps, just type in your starting address, & then your destination & you will get very accurate directions, ..... usually.
After you find a good area to hunt for minerals you need more information. The internet is a great resource, but I think that books give you a much better perspective. Look for books on the area, abandoned mines, area geology, or just mineral collecting in the area you want to explore. Before you ever buy a book, look in your local library, you might find something that will give you a good idea about where to collect. If I was looking for Bancroft mineral collecting for example I would consider ordering their Mineral Collecting guidebook, this book would give you a good “beginners” view of where you can collect. If you are starting mineral collecting right from the beginning I would suggest you don’t try to overwhelm yourself. Limit how many sites you plan to explore because unless you have lot of time you will not come even close to seeing them. Start of easy.
So by now you have some info on mines & mineral sites in the area. Now what. A good idea is to look through all your research & choose some locations to visit. As you are just beginning its best to choose sites to visit that are easy to access (are close to a road, are family friendly, & are safe). If you find any pay to sites, they are a good place to begin as they are easier to access & usually safer. You many want to research your sites on the internet more to find new info or obstacles that you may have to overcome to reach a site, such as a very crappy road.
With a few located sites you should consider accommodations, if the site is far away or if you plan to stay for a while.
When looking for accommodations you basically have a few options: stay with family & friends, hotel, motel, bed & breakfast, cottage rental, or camping. If you are strapped for cash & you have no immediate family & friends in the area, camping may be the cheapest option or a motel. For example, in Bancroft the least expensive motel to stay in is the Bancroft Motor Inn with rates around $90+ Canadian a night. But if you decided to camp at a provincial park, such as Silent Lake Provincial Park south of Bancroft it would cost you 20-40 a night depending on the quality of site & if its electric or not. Camping is a good choice during the summer when its warmer in Canada, for the spring & fall its best to go with roofed accommodations.
Step 3: Acquire tools & equipment
Now we get to the topic of tools & equipment. The amount of tools you buy for your hobby is as little or as much as you want. Good beginners tools are: a rock hammer or a geologist pick (it’s the iconic symbol of a rockhound), a small or large cold chizzle, & or a mallet, a small bucket, safety gear, & tough work boots. These are just tools that you need as a beginner, as you progress more into your hobby you will find like me that the number of tools & equipment you have will grow greatly. Most tools can be found at Canadian Tire or the Home Depot. For more specialty items, such as a rock pick you may have to find a specialty store, or order online. I bought my rock pick in Bancroft, as it was much easier to find such an item at a rock shop in a mining town then in the big city.
Now you have the tools, know the location to collect & you have plans how to get there. All that you have left to do is collect. There is not much to the method you use to get mineral samples. You just chip pieces from larger rocks with your mallet & chizzle. Or you dig in the rock pile with a shovel or the pick end of your rock hammer. As you explore more & more you will develop your own technique for collecting.
Mineral collecting location types
When you go to a site you must be aware of what kind of site this is, the dangers it poses, & accessibility. There are basically a few kinds of mineral collecting sites: roadcuts, trenches, dumps, cuts, tunnels & adits. For most collectors we will collect at roadcuts, mine dumps, trenches & open cuts. It is best to not venture into adits & tunnels as they might have many other dangers, i will mention some of them later in this article.
Roadcuts: These sites are usually overlooked by a a large amount of collectors but they are great locations to collect. A roadcut is right beside a road & it usually allows you to park right beside the cut allowing ease of collecting. Roadcuts are plentiful in mineral rich areas & very easy to access. They are great for beginner & experts alike. When you collect here, don't climb the cut & don't fill in the ditch with rock, it will aggravate maintenance workers & can lead to closure of the cut to collectors.
Here is a roadcut at Burleigh Falls.

Another roadcut: Highway 28 east Schorl roadcut.

Mine Dumps: These are located at any mine & offer great potential for collecting due to the large presence of broken up minerals. When you explore such sites try not to climb the dump hills if they are steep & look unstable. Don't jump & always have sure footing.
Keep in mind that not all mine dumps are going to be easily located, unless the site is very ofter visited & not in deep vegetation it is very likely that it will be overgrown.
Here are some mine dumps at Beryl Pit.

Mine dump on slope at Cardiff Uranium Mine.

Canada Radium Mine, dumps

CN Dump in downtown Bancroft.

Dump remains at the Montrose Occurrence.

A small part of the Dumps at Craigmont Mine. This is an example of an unstable dump, see the large loose rocks, very easy to slip and fall or tumble, or get a boulder to fall on you. Beginners should avoid these.
Trenches & Open cuts: these are located in most mines & they offer collectors the opportunity to chip into the rock wall for crystals. They usually also have a dump adjacent to them where you can shift through the material. Just be careful when you chip at the rock wall, it might be unstable. Use your judgment, you might have better finds at the dumps anyway instead of the trenches.
Here is a trench at Saranac Mine, Pegmatite showing.

Here is part of a trench at Bear Lake Diggings. In this case the trench is below ground level, it might be flooded during heavy rains.

Here is the rock floor section of the open cut at Beryl Pit.
Tunnels & Adits: It is not recommended that you visit these locations as you begin collecting because they are more dangerous spots. Here is how an adit looks.
Here is a partially blocked off Adit at Cardiff Uranium Mine.

Two adits at MacDonald Mine.


A cemented up adit/tunnel at Dwyer Fluorite mine. As seen through small hole in the wall.

This should have given you a brief image where to collect & where not to, just do a bit of research into the above structures so you know the dangers & opportunity that each possess. Now lets talk safety.
Safety
As a beginner to the hobby or even an experienced collector, safety should be a top concern. Lets just face it, rockhounding is a dangerous hobby. You get exposed to wild animals, sharp rocks, flying debris, old collapsible mine shafts, heavy & blunt tools, sharp tool, back pain from too much rock carrying, & a infinite chance of getting scrapes, bruises, cuts, & other injuries. Here is a list of some safety equipment you should have with you when you go out there:
- 1-2 safety goggles (you might loose one or have one scratched up increasing the likelihood you might take of the glasses when you
hit & chip at rock) ALWAYS WEAR SAFETY GOGGLES WHEN YOU WORK AROUND ROCKS. Your eyes are too precious & fragile to risk, just wear
the goggle, you will be glad you did, as any rockhound will tell you. It a bit hard to drive home when you can't see. The are
about 10 -40 dollars.
- Hard hat: Always a good idea when you work around cliffs, adits, and rock dumps. Wear the hat, better to be safe then sorry.
- Steel toed boots: they are always a good idea as they will protect your feet from falling rocks & sharp objects & they are usually
more comfortable when compared to running shoes. Wear them & save your feet. It is around 50 dollars.
- Dust mask. This will help protect you from inhaling dust. Fine dust can lead to long term health problems so wear the mask when you
chip rocks, or when you cut them. This is especially very important when you are dealing with radioactive & asbestos minerals.
These can be a few dollars, or larger better respirators can be in the 50 dollar range. Don't cheep out here, radioactive or
asbestos dust can be with you for life & cause many serious health problems.
- UV light goggles: this is when you use a Ultraviolet light to look for fluorescent minerals. The exposure to UV light will give you
sunburn on the skin, but it can also burn your eyes if looked into the lamp directly & exposed for a short period of time. The
goggles are a necessary addition to any person who wants to collect fluorescent minerals. They are in the 20-30 dollar range.
- Bug Spray: i mention this here because mosquitoes carry West Nile virus & it can cause serous health risks if you are exposed. Most
mines or sites are located int the thick woods & you will will most likely be bit by one (many is more likely) if you are not
protected. So buy some bug spray with deet & sprays yourself with the "bug shield". It will greatly reduce the chance of being bit.
Also wearing long clothing will help. This ranges in price from 4-10 dollars.
- Knee pads: Knee pads will greatly protect your knees from sharp rocks that could damage your knee, if that were to happen walking
would be a large problem. They are inexpensive to buy & will greatly help you. They range in price from 5-40 dollars.
- First aid kit. Simply indispensable. This is useful no matter where you go, always have one with you on the trail & a more
extensive one in the car. From cuts to breaks, it will always come in handy. They range in price from 15-40 dollars Canadian,
depending how well stocked they are.
- Tough work gloves: the best are ones that are made of leather, they can shield you much more from scrapes but are a bit stiffer.
They are an essential tool as you will use them VERY often. They cost around 5-60 dollars, depending on the quality & toughness.
These tools are all designed to keep you safe, so use them & you will feel much better. You safety is very important so don't take any shortcuts with your life. In the wild only the prepared survive.
Radioactivity
This is more for the advanced collector but there is a good chance that a beginner will accidentally pick up a radioactive sample with ought their knowledge. As with all dangerous elements you must be aware of the dangers when handling such samples. A very important precaution is just to avoid the radioactives, there are many crystals out there that are just as interesting & are much safer. Here are some precautions when dealing with radioactives.
1. If you do have radioactives, never cut the piece & inhale the dust. THIS is extremely dangerous as you can develop very serous health problems from the radiation exposure & the poison of the radiative elements. Always wear a GOOD respirator when dealing with radioactives, this goes the same for asbestos minerals.
2. Wash hands after handling radioactives, & never eat & keep food close to radioactives also.
3. Never keep radioactives in a place that you eat, spent a lot of time such as a bedroom or living room. Its probably just safer to keep them outside of your house.
4. Limit the amount of time you handle the piece & that you spend at a mine that has elevated radiation levels.
5. Try not to store radioactive in a tightly closed boxes as this will allow for a dangerous gas, Radon to build up. Keep the box away from your home & well ventilated.
6. The best advice here is: Don't Collect Radioactive minerals as they are an unnecessary danger.
Here is a link to a good article by Allyson Rowan that explains radiation & minerals with much more detail. It is encouraged that you read this article. Just copy the link into any window.
http://www.nexus08.clara.co.uk/article.RadioactiveMineralSpecimens.A4.pdf
Now you might wonder why the hell would anyone want to collect radioactive's, when you read all the warnings above & in Allyson's article. Well a few reasons are that radioactive are in their way somewhat rare, especially well formed crystals such as Thorite, Euxenite-Y, Betafite, & Uraninite. Despite of their rareness its still best to avoid them, as they require considerable knowledge, preciousness, & maintenance. There are plenty beautiful crystals out there that are not radioactive. When you collect radioactives you are playing with Dragons. But of course some of us will anyway. Know the risks.
Here are some picture of radioactive minerals:
Uraninite (black cube)

Betafite (usually as brown/black octahedra)
Euxenite-Y (brown/black Orthorhombic crystals)
Uranophane (yellow Monoclinic needle elongated crystals)
Zircon (mildly radioactive usually)(yellow, black, brown, red, pink, Tetragonal crystals)
Uranothorite (mostly shapeless, crude & earthy brown)

Fluorescent Minerals
This is a relatively new hobby when compared to the field of collecting. Fluorescent mineral collecting can be one of the most enjoyable ways to collect as you are dealing with relatively safe minerals. These minerals usually have limited harmful elements & no radioactivity. In order to collect florescent you must first locate a place that has them, since they are a bit harder to find then regular minerals. One way to search for them is to just type into your search engine, for example: Bancroft, Ontario, fluorescent minerals. Modify this search as best you can to fit your home area. Once you find an area you must decide what kind of lamp you need. In order to collect florescents you need a special Ultraviolet lamp. These lamps come in short, medium, & long wavelengths. The wavelength will affect what minerals flouress. The best lamp to start with is a short/long wave combo lamp. If you are low on cash, go with a short wave lamp as most (about 90%) of fluorescent mineral glow under short wave light, the remaining are mostly under long with a bit under medium. You can buy a large field lamp to carry with you or you can buy smaller flashlight size UV lights. The difference of course is power, a larger more powerful lamp will make more minerals glow from a distance while a small flashlight will require you to be very close to the mineral to get a reaction. UV lamps are not cheap, be warned. They range in price from the small flashlights starting at $35-80 Canadian, & the larger field lamps from $200 to over $1000 for good powerful display lamps. Its quite a commitment but it can be a very fun way to collect. So you got the lamp, now what you do. You can get florescents 4 ways: buy them, trade for them, look for them at night at a site, or look for them during the day under a light proof tarp at a site. If you choose to collect at night always collect with someone else, & make sure you have visited the site at daylight before. You do not want to get lost or disoriented at night. Always walk noisily & with purpose to warn wild animals of your presence, so they can bolt before you encounter them. It would be recommend that you have some kind of weapon when exploring sites at night just in case you encounter a vicious wild animal, as they are more active at night. Also don't wear clothes that you cooked food in, it might attract animals to you as they can smell the food on it. Collecting at night has additional dangers but you will be able to see minerals very clearly. It is HIGHLY recommended that a beginner will not collect at night because this requires some experience & knowledge to be there safely. Only collect in this way if you are part of a group that is knowledgeable in the outdoors & have collected at night multiple times, NEVER go alone. One way that a beginner can collect is during the day & using a light proof tarp. You can buy a tarp or you can make one by gluing a number of garbage bags together with duct tape so they block the light. The tarp should be at least 10 x 10 feet to cover you effectively. Whey you go to the site, cover yourself with the tarp so all light is blocked while you are over the minerals & you turn on your light & collect what glows. Easy. In order to use the larger UV field light you will need some kind of power pack to bring with you. This is another thing to carry, as fuel cell is quite heavy. If are on foot or on a bike it can be a pain, but that is one of the costs of collecting in this way. Always wear special UV goggles to protect your eyes from the UV light. That is basically what you need to know about florescent. I consider this to be an advanced aspect to the hobby so i would not recommended this to beginners but who knows you might want to give it a try. If you are interested in UV lights & want a bit of knowledge about them give this site a try: http://www.mineralman.net/index.html they carry a wide assortment of UV lights, you can look at the prices to give you some idea how much they cost, & the site will you give a bit more info on UV lights. Take a look & see if this for you. Collecting florescents can be a unique aspect of the hobby, as you can easily see the samples glow & it is much easier for others to be interested & appreciate your rocks when they see them glow. It is a unique experience.
Here is a picture of a Shortwave UV field light in the middle, with a power pack on the left & a small flashlight longwave UV light on the right.

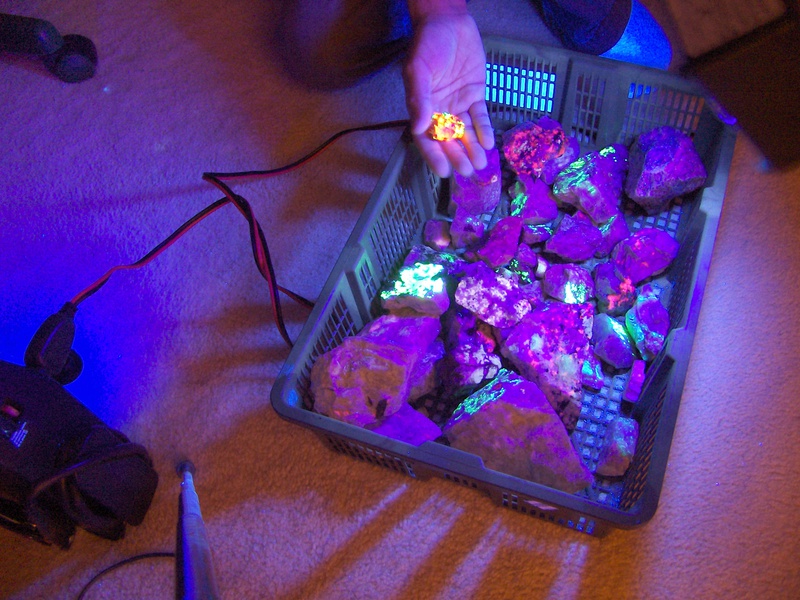
Here are a bunch of florescent mineral that i have found at the CN dump, Morrsion Quarry, & bought from New Jersey & other locations. The UV lamp produces the soft glow on all white/whitish surfaces reflecting the light a bit. Always wear special goggles when you look at flourescents.
Now lets talk about mine Dangers
Mine Dangers
Most mines are dangerous places as there are hidden underground workings, adits, and steep slopes. The danger is there that you may fall into an underground tunnel as most mines are abandoned & have a greater risk to collapse. Also if you venture into a tunnel it could collapse, or you my be exposed to dangerous gasses such as radon or fallen timbers, or sharp corroded metal. One other thing regarding tunnels & adits. If you venture & explore them very early spring or fall you should be aware that there is a danger that you might encounter a wild animal hibernating in the tunnels. Bears like to hibernate in old tunnels & adits, so there is a chance you can encounter one. To be safe, just avoid such tunnels & adits & keep your ears open when you are near such structures. It would be a good idea to read up on safety when encountering a bear, its is a possible encounter & you must know what to do in it. Bears are generally scared of you more then you of them but they can be dangerous if threatened or backed in a corner or surprised. Just do some research into bear encounters. You are in the wilds, remember that. Here are some points regarding bear:
- they are attracted to strange noise, such as radios, singing, & musical instruments
- they are attracted by food smell, don't wear the clothes you cooked food in, they will still have the smell.
- if you encounter a bear, back always slowly, never run & climb a tree they are both great climbers & runners over short distances.
These are some very basic points regarding bears, preform more research on encounters with them to be better prepared should you encounter one.
Another danger is with old rock dumps. They can be steep or very unstable. Never climb one because you can create a rock avalanche that could crush you or seriously injure you. Avoid the ledges & keep to safe & stable areas. The same goes for mine edges, cliff walls, or rock walls. Don't venture to close from both the bottom & the top, always safety goggles, steel toe shoes, & a hard hat.
Be careful as you walk on rock dumps, it can be very easy to slip & injure yourself. Walk slowly with steel toe shoes & don't carry too much weight, also don't jump, you can easily trip & ruin your trip & health.
Do not underestimate mines, they are dangerous & should be treated with respect.
One last point regarding safety i want to mention is regarding private property
Private Property
Always respect owners rights. Private property is private property, owners will not take kindly to trespassers. If you see a private property sign or no trespassing, don't trespass. If you really want to visit the mine try contacting the owner but never trespass. If you trespass you can be charged or worse. You would not want someone trespassing on your land would you?
Another thing to keep in mind is minerals rights on land. There might be no house on the mine you enter but someone might have staked the land & owns the mineral rights to that property. Collecting here is absolutely forbidden so keep in mind that such claims are located throughout land of old mines & mineral rich territory. If there is no sign on the property its difficult to know if any mineral claims exist but you will see markers. If you want to be really sure try contacting the nearest town office, archive, library, or natural resources office they will have information regarding mineral claims. Also look at the local geological website of the town or region, they might have info on what property has been claimed. Preform some research online into mineral claims, as this is an important subject that all rockhounds must be aware off.
Hunting Seasons
Just a quick note about hunting seasons. Some mines that open to collectors may be closed during hunting season. Before you visit a mine you should be aware of hunting seasons in the state or province that you intend to visit. Some collecting spots in Ontario are closed especially during deer hunting season, two sites that close at this time are the Burgess Mine in Boulter, & the Bessemer Mine in Bessemer. People who own these properties will not take too kindly to trespassers, as they trespass for one during prime hunting season, they disturb the game, & they risk the hunter shooting them by accident, & there is also the risks of stepping on a snare or trap. Just be aware of hunting seasons, as the danger from hunting in the area can be an issue to your safety. If you choose to venture during hunting season, wear lost of orange so you can be clearly seen by hunters & make sure you are not going to a site that forbids hunting collecting.
Transportation Method
This is just a quick note about transportation to sites. As you might have guessed it a 4X4 vehicle will make more sites easier to access for you, as most old mine roads are TERRIBLE, if you ever been to Bear Lake Diggings then the last portion before the site is such a road. Do research on a site, you might find that the road is unsuitable to your kind of vehicle and you might have to walk. If you have to walk, decide if you are willing to walk the distance. It could be too long. Do the research so that when you arrive you don't get a big surprise. Walking to sites is usually what happens so be prepared for it.
Weather & Electronics
I just to mention briefly that you must also keep in mid the weather conditions when you go out collecting & its effects on your electronic equipment. My main point here is regarding a GPS. If the weather is very moist & raining the moisture can build up in your GPS and cause it to malfunction or shut down. Always keep your GPS covered or at least limit the amount of exposure to rain when you look at it. Another issue is cold weather, it can deteriorate your batteries and decrease their charge greatly. when you are traveling to your site always keep the batteries with you, not in the trunk where they are cold. Better they stay warm and last longer. The same goes for your camera. It is also best to have new batteries, not rechargeables which have a lower charge to begin with. If your battery's are too cold they can cause your GPS to shut down randomly. Could be a big problem during a long hike. Also if you have an already weak battery the cold could cut its life & your estimate of its charge can cause to you loose your GPS's power source half way to the site, or back. Simply have extra new battery with you when you head out, and keep them out of the cold as much as possible.
As i mentioned some basic info that you should be aware off here are some classification of mineral collectors.
Now I will briefly mention different levels of mineral collectors, the difference is basically equipment.
Level 1: Beginner Rockhound
At this stage you most likely will have very few literature with you, most likely just one or two mineral book. You will probably visit only a few sites on your first expedition & those that are probably easy to access. Your list of tools will most likely be:
- rock hammer, mallet or hammer, bucket, boots
- chizzle
- 1 or 2 collectors book
- 1 mineral identification book
As soon as your visit your first site you will begin to leave this stage to the next stage.
Level 2: Intermediate Rockhound
Here is where you consider exploring other sites then your first one or two that you did when you begun your hobby. Your list of equipment will grow just a bit, as you most likely will explore only once a year. Your list of tools will most likely be:
- rock hammer, mallet or hammer, bucket, boots
- chizzles, one larger then the other
- 1 or 2 collectors book
- 1-2 mineral identification book
- performing more research
The only difference is that you now consider mineral collecting as your hobby but you perform it very occasionally, this means that you will stick to the hobby & not just try it out as in the first stage. The next stage is one that most rockhounds are in.
Level 3: Rockhound
Here you consider your hobby to be much more then just a small thing you do once & a while. You consider it more seriously & you respect the risks involved as mineral collecting as it is a bit of a risky hobby. Here you do a lot of research, chat with other collectors through phone or internet, & you go collecting multiple times a year. The vast majority of your time is spend on research of sites, mineral cleaning & preparation, & display & identification. As you might have guessed your list of equipment has grown substantially. Here is what my list of equipment is for this stage:
- rock hammer, mallet, sledgehammer
- thin chizzle, large cold chizzle with guard, extra cold chizzle.
- Large & small bucket
- Small trolley to carry bucket & tools
- GPS
- Geiger counter
- Short & Long Wave portable lamps with power pack
- Digital camera to take site pictures & later mineral images
- Night vision goggles for night UV mineral collecting
- Utility vest & load bearing vest with multiple pockets.
- Topographic maps
- A lot of mineral literature, guide books, site info
- Measuring tools
- Survival gear, knives, axe, fire starting tools.
- Multiple flashlight
- Binoculars
- Bug replant, bug hat
- Knee pads, leather gloves, & work gloves, safety goggles, dust mask
- Old jeans, shirts, & jackets
- First aid kit, survival & first aid book
- Boots & wadders. Etc..
I wasen't kidding about it growing now was i?
As you can see, I take my hobby very seriously & I hope that you will too. I have massed my trove of equipment over many years not just bought all of them at once. Keep in mind that you might be going to old mines & abandoned locations far from a road & civilization. That is why I have all this gear, if you are prepared nothing will go wrong that you can’t come over & emerge victorious. You must be prepared, & take with you all that you need, nothing more. If you take too much all you will have is extra weight. You must research your site, see if you need specialty equipment, UV lamp, Geiger counter, sledgehammer. If you bring them, they only will tire you & limit how many samples you can take out. This can be a big problem if the site you explored is a far to walk too & over rough terrain. I usually take A VERY small amount of equipment with me when I go to the actual site, most will stay in the car. If you are going on foot, weight is a great factor.
Also after you have been collecting for a while, its is inevitable that your collection will start to get a bit “big”. As such you probably will begin to specialize. This means that your will just stop looking for any minerals, you will focus on a few that have a number of properties you want. These properties could be: Radioactivity (as in Uraninite, Thorite, Betafite), Fluorescence (as in Flourite, Calcite, Hackmanite, ), Magnetism (Magnetite), Micro crystals, a specific mineral (such as Corundum, Apatite, Sodalite), or simple well defined crystals (as in Corundum, Zircon, Scapolite, Apatite). You could also mix a few categories, for example these days I try to collect: fluorescent minerals, well formed radioactive crystals, well formed non-radioactive crystals, & any large crystals. Of course on of my goals is to find as many different species of minerals I can, but I won’t mass massive piles of each, only a very select number of samples. I am just starting to specialize mainly because of the boxes upon boxes on minerals that i have, room is starting to be an issue.
Now, when it comes to purchasing specialty equipment a very good place to shop is Ebay. There you will be able to find a Geiger counter, rock picks, UV lamps, GPS, any anything else you can think off. But don't limit yourself there, shop around especially for expensive items like a UV lamp.
I want to mention a quick point about Google maps. Remember this name, this application of Google can be a miracle research & planning tool. You can use it to zoom in to an area where a mine is & plan your adventure. Also another very useful feature is the distance calculator, this can help you locate a site if you only have a distance from a point to work with. You can also type in GPS coordinates to see mines or locate yourself after your adventure. This is a great way to explore your search. Another good tool is NASA's WorldWind, this application allows you to zoom into any area of the Earth & you can look upon an area topographically allowing you to see the hills & terain of the site from a bird eyes view or from eye level. Give it a look, you might like it.
Don’t forget to search your states or provinces Geological Survey website. They have a wealth of information on minerals, mines, & collecting potential around where you live.
Always be careful when you visit a new site & you should leave info with someone where you plan to go if you travel alone. Keep in mind that you might be in the wild & on private property, so be careful & respect owners. Most will not take to kindly to trespassers. Be safe & take no risks, this is a hobby not combat.
Resources
Here are some good books, sites, shows, & other literature that can help you get more information an all aspects of the hobby and additional knowledge that you should have.
Fluorescent Mineral Collecting:
-websites
1.) Mineral Man ( a good site with basic info on fluorescent mineral, lamps, and accessories)
http://www.mineralman.net/index.html
2.) The Fluorescent Minerals (good info about what is florescence)
http://www.galleries.com/minerals/Fluoresc.htm
3.) Fluorescent minerals (good site with mineral samples)
http://wordcraft.net/fluorescent1.html
- books
1.) The World of Fluorescent Minerals, by; Stuart Schneider
2.) Collecting Fluorescent Minerals, by; Stuart Schneider
Radioactive Minerals:
-websites
1.) Radioactivity in Minerals (good site with info on radiation & minerals)
http://webmineral.com/help/Radioactivity.shtml
2.) Naturally Radioactive Minerals (partial list of radioactive minerals)
http://www.survivalunlimited.com/radioactivemin.htm
3.) Radioactive Mineral Samples (a basic PDF file explaining handling procedure)
http://www.nps.gov/history/museum/publications/conserveogram/11-10.pdf
-books
1.) Introduction to Radioactive Minerals, by; Robert Lauf, PhD (good introduction to the topic)
Wilderness Survival:
-websites
1.) Wilderness Survival (very comprehensive site on wilderness survival)
http://www.wilderness-survival.net/
2.) Survival topics (up to date info & many survival techniques)
http://www.survivaltopics.com/
-books
1.) SAS Survival Handbook, by; John Wiseman
2.) Survivial, by; Department of the Army Field Manual 1970
3.) Survive!, ;by Les Stroud
Shows:
1.)Kirsten Gum: Treasure Hunter (probably one of the only shows that had anything to do with rockhounding out there)
2.) Survivorman (mainly to do with wilderness survival under likely circumstances, quite realistic conditions)
So here is some info, hope it helps.
Enjoy your new hobby, & take care. Rockhound Safe & with Determination.
Reference: Allyson Rowan, Here Be Dragons or the care & feeding of Radioactive species, article.
How to begin your Rockhounding hobby.
By: Michal Adamowicz, Rockhound
I thought it would be a good idea to write a beginners guide into the hobby of mineral collecting, or Rockhounding. I know that when you want to begin a new hobby it can be hard to understand how to begin, what to get, how to do it, & where to go. I hope this guide will be a good bit of help to any aspiring rockhounds & provide new info to existing rockhounds.
There are a lot of reasons that you may be interested in mineral collecting. You might want to have an activity that allows you to explore the outdoors, or to explore the mining history of your home, or maybe you want to find nice mineral samples. It could also be that you want to sell what you find & make a living from this, also you want to tough it out & have a challenge, or just to relax in the outdoors. Your reasons for minerals collecting can also be a mix of the above, it usually is. I will write this in sections as it will be much easier to follow.
Step 1: Research
Ok so you want to look for minerals, what do you do first?
Before you even consider buying any equipment you must to research. Research, Research, Research, these three not so simple words are the beginning of any hobby & you will use them continuously as you collect minerals.
Well to begin, it’s a good idea to research the area around your home, to look for mineral locations. Try to read a bit about the geology of your surrounding area, this can give you a good idea of what minerals are located around you. If you find that there is not much collecting potential around your immediate area try to expand your search. Since I mainly collect in the Bancroft area of Ontario, Canada I will refer to this area in most of my examples. I live right now in Mississauga, Ontario & if I research the geology of the surrounding area I will find mostly limestone & the Niagara escarpment, not too much collecting potential. So to find better locations I would expand my search by searching for say “Mineral Collecting in Ontario’. This way I will get websites with collecting in around Ontario, this way I can find an area that a lot of minerals occur. In my search I would find the town of Bancroft, & after a bit of reading about it I would discover that the area surrounding it is rich in minerals. You can use both Google & Yahoo, they are both equally good search engines. Another good idea is to join a mineral club, look around your area you might find one. They can be a wealth of info on locations especially close to home. Also joining a club might give you access to locations that solitary collectors can’t get access. Just so you know there are very few sites that lone collectors have trouble accessing, & they are most operational mines & quarries.
Here are good research tools:
- search your area in Google/Yahoo or other search engine. If your don’t find anything local try to widen your search by
searching your state or province. For Example: “Mineral Collecting locations, Texas” or “ Mineral collecting
locations, Ontario”. Widen your search parameters & use different words in the search engine to clarify your search.
- Join a mineral club in your area, they can give a great hand in beginning collecting in your area.
- Look for stores in your area that sell minerals & fossils, there is a good chance that someone there might have info on a
good mineral region around you. Also metaphysical store tend to sell crystals, they might know something.
- After you find a location, search the internet, library, online bookstore (Amazon, Ebay) for books related to the location.
Step 2: Research site/area & get directions
So now you have done a bit of research, so hopefully you have located an area near you. So what’s the next step? A good idea would be to get driving directions to the area, so you have a feel if you want to travel to the area. If you can make the journey, then more research is in order. You best bet is to use Google Maps, just type in your starting address, & then your destination & you will get very accurate directions, ..... usually.
After you find a good area to hunt for minerals you need more information. The internet is a great resource, but I think that books give you a much better perspective. Look for books on the area, abandoned mines, area geology, or just mineral collecting in the area you want to explore. Before you ever buy a book, look in your local library, you might find something that will give you a good idea about where to collect. If I was looking for Bancroft mineral collecting for example I would consider ordering their Mineral Collecting guidebook, this book would give you a good “beginners” view of where you can collect. If you are starting mineral collecting right from the beginning I would suggest you don’t try to overwhelm yourself. Limit how many sites you plan to explore because unless you have lot of time you will not come even close to seeing them. Start of easy.
So by now you have some info on mines & mineral sites in the area. Now what. A good idea is to look through all your research & choose some locations to visit. As you are just beginning its best to choose sites to visit that are easy to access (are close to a road, are family friendly, & are safe). If you find any pay to sites, they are a good place to begin as they are easier to access & usually safer. You many want to research your sites on the internet more to find new info or obstacles that you may have to overcome to reach a site, such as a very crappy road.
With a few located sites you should consider accommodations, if the site is far away or if you plan to stay for a while.
When looking for accommodations you basically have a few options: stay with family & friends, hotel, motel, bed & breakfast, cottage rental, or camping. If you are strapped for cash & you have no immediate family & friends in the area, camping may be the cheapest option or a motel. For example, in Bancroft the least expensive motel to stay in is the Bancroft Motor Inn with rates around $90+ Canadian a night. But if you decided to camp at a provincial park, such as Silent Lake Provincial Park south of Bancroft it would cost you 20-40 a night depending on the quality of site & if its electric or not. Camping is a good choice during the summer when its warmer in Canada, for the spring & fall its best to go with roofed accommodations.
Step 3: Acquire tools & equipment
Now we get to the topic of tools & equipment. The amount of tools you buy for your hobby is as little or as much as you want. Good beginners tools are: a rock hammer or a geologist pick (it’s the iconic symbol of a rockhound), a small or large cold chizzle, & or a mallet, a small bucket, safety gear, & tough work boots. These are just tools that you need as a beginner, as you progress more into your hobby you will find like me that the number of tools & equipment you have will grow greatly. Most tools can be found at Canadian Tire or the Home Depot. For more specialty items, such as a rock pick you may have to find a specialty store, or order online. I bought my rock pick in Bancroft, as it was much easier to find such an item at a rock shop in a mining town then in the big city.
Now you have the tools, know the location to collect & you have plans how to get there. All that you have left to do is collect. There is not much to the method you use to get mineral samples. You just chip pieces from larger rocks with your mallet & chizzle. Or you dig in the rock pile with a shovel or the pick end of your rock hammer. As you explore more & more you will develop your own technique for collecting.
Mineral collecting location types
When you go to a site you must be aware of what kind of site this is, the dangers it poses, & accessibility. There are basically a few kinds of mineral collecting sites: roadcuts, trenches, dumps, cuts, tunnels & adits. For most collectors we will collect at roadcuts, mine dumps, trenches & open cuts. It is best to not venture into adits & tunnels as they might have many other dangers, i will mention some of them later in this article.
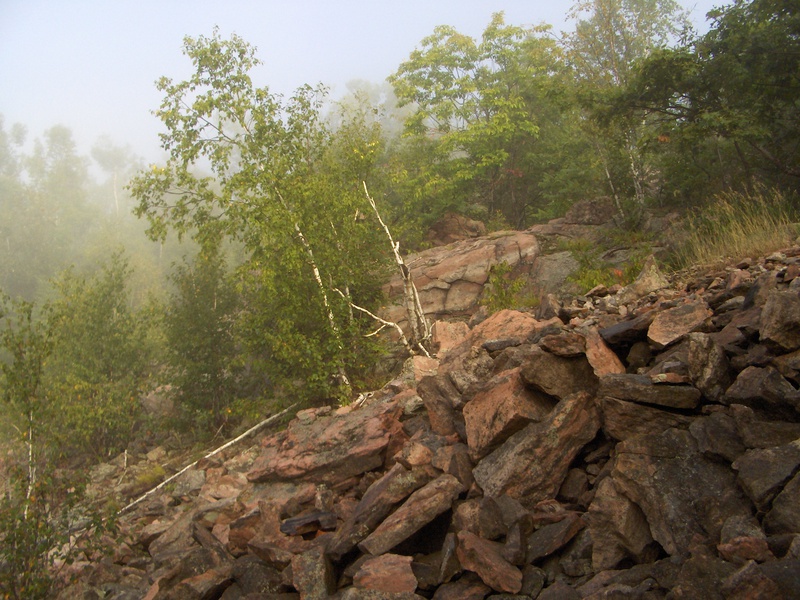
Roadcuts: These sites are usually overlooked by a a large amount of collectors but they are great locations to collect. A roadcut is right beside a road & it usually allows you to park right beside the cut allowing ease of collecting. Roadcuts are plentiful in mineral rich areas & very easy to access. They are great for beginner & experts alike. When you collect here, don't climb the cut & don't fill in the ditch with rock, it will aggravate maintenance workers & can lead to closure of the cut to collectors.
Here is a roadcut at Burleigh Falls.
Another roadcut: Highway 28 east Schorl roadcut.
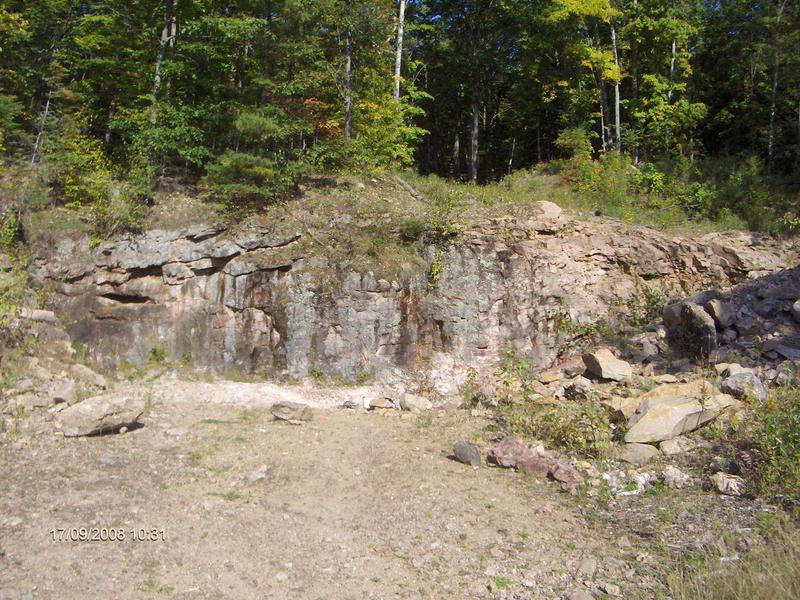
Mine Dumps: These are located at any mine & offer great potential for collecting due to the large presence of broken up minerals. When you explore such sites try not to climb the dump hills if they are steep & look unstable. Don't jump & always have sure footing.
Keep in mind that not all mine dumps are going to be easily located, unless the site is very ofter visited & not in deep vegetation it is very likely that it will be overgrown.
Here are some mine dumps at Beryl Pit.
Beryl Pit, view of 2nd main dumps
Beryl Pit, Quadeville area, Lyndoch Township, Brudenell-Lyndoch-and-Raglan, Renfrew County, Ontario, Canada
Beryl Pit, Quadeville area, Lyndoch Township, Brudenell-Lyndoch-and-Raglan, Renfrew County, Ontario, Canada
Mine dump on slope at Cardiff Uranium Mine.
view of dumps, right of building
Cardiff Uranium Mine, Cardiff Township, Highlands East Township, Haliburton County, Ontario, Canada
Cardiff Uranium Mine, Cardiff Township, Highlands East Township, Haliburton County, Ontario, Canada
Canada Radium Mine, dumps
CN Dump in downtown Bancroft.
close up of the CN Dump from Goulding-Keene Quarry
CN Rock Dump, Town of Bancroft, Hastings County, Ontario, Canada
CN Rock Dump, Town of Bancroft, Hastings County, Ontario, Canada
Dump remains at the Montrose Occurrence.
view of dump remains, east of the main hill
Canal dump, Niagara Falls, Niagara Region, Ontario, Canada
Canal dump, Niagara Falls, Niagara Region, Ontario, Canada
A small part of the Dumps at Craigmont Mine. This is an example of an unstable dump, see the large loose rocks, very easy to slip and fall or tumble, or get a boulder to fall on you. Beginners should avoid these.
Trenches & Open cuts: these are located in most mines & they offer collectors the opportunity to chip into the rock wall for crystals. They usually also have a dump adjacent to them where you can shift through the material. Just be careful when you chip at the rock wall, it might be unstable. Use your judgment, you might have better finds at the dumps anyway instead of the trenches.
Here is a trench at Saranac Mine, Pegmatite showing.
Here is part of a trench at Bear Lake Diggings. In this case the trench is below ground level, it might be flooded during heavy rains.
View of the right area of the trenches
Bear Lake diggings, Monmouth Township, Highlands East Township, Haliburton County, Ontario, Canada
Bear Lake diggings, Monmouth Township, Highlands East Township, Haliburton County, Ontario, Canada
Here is the rock floor section of the open cut at Beryl Pit.
view of open cut exposing the rock floor area
Beryl Pit, Quadeville area, Lyndoch Township, Brudenell-Lyndoch-and-Raglan, Renfrew County, Ontario, Canada
Beryl Pit, Quadeville area, Lyndoch Township, Brudenell-Lyndoch-and-Raglan, Renfrew County, Ontario, Canada
Tunnels & Adits: It is not recommended that you visit these locations as you begin collecting because they are more dangerous spots. Here is how an adit looks.
Here is a partially blocked off Adit at Cardiff Uranium Mine.
capped adit left of the shaft building
Cardiff Uranium Mine, Cardiff Township, Highlands East Township, Haliburton County, Ontario, Canada
Cardiff Uranium Mine, Cardiff Township, Highlands East Township, Haliburton County, Ontario, Canada
Two adits at MacDonald Mine.
view of 1 of the main chamber side passages
MacDonald Mine, Monteagle Township, Hastings Highlands Municipality, Hastings County, Ontario, Canada
MacDonald Mine, Monteagle Township, Hastings Highlands Municipality, Hastings County, Ontario, Canada
A cemented up adit/tunnel at Dwyer Fluorite mine. As seen through small hole in the wall.
This should have given you a brief image where to collect & where not to, just do a bit of research into the above structures so you know the dangers & opportunity that each possess. Now lets talk safety.
Safety
As a beginner to the hobby or even an experienced collector, safety should be a top concern. Lets just face it, rockhounding is a dangerous hobby. You get exposed to wild animals, sharp rocks, flying debris, old collapsible mine shafts, heavy & blunt tools, sharp tool, back pain from too much rock carrying, & a infinite chance of getting scrapes, bruises, cuts, & other injuries. Here is a list of some safety equipment you should have with you when you go out there:
- 1-2 safety goggles (you might loose one or have one scratched up increasing the likelihood you might take of the glasses when you
hit & chip at rock) ALWAYS WEAR SAFETY GOGGLES WHEN YOU WORK AROUND ROCKS. Your eyes are too precious & fragile to risk, just wear
the goggle, you will be glad you did, as any rockhound will tell you. It a bit hard to drive home when you can't see. The are
about 10 -40 dollars.
- Hard hat: Always a good idea when you work around cliffs, adits, and rock dumps. Wear the hat, better to be safe then sorry.
- Steel toed boots: they are always a good idea as they will protect your feet from falling rocks & sharp objects & they are usually
more comfortable when compared to running shoes. Wear them & save your feet. It is around 50 dollars.
- Dust mask. This will help protect you from inhaling dust. Fine dust can lead to long term health problems so wear the mask when you
chip rocks, or when you cut them. This is especially very important when you are dealing with radioactive & asbestos minerals.
These can be a few dollars, or larger better respirators can be in the 50 dollar range. Don't cheep out here, radioactive or
asbestos dust can be with you for life & cause many serious health problems.
- UV light goggles: this is when you use a Ultraviolet light to look for fluorescent minerals. The exposure to UV light will give you
sunburn on the skin, but it can also burn your eyes if looked into the lamp directly & exposed for a short period of time. The
goggles are a necessary addition to any person who wants to collect fluorescent minerals. They are in the 20-30 dollar range.
- Bug Spray: i mention this here because mosquitoes carry West Nile virus & it can cause serous health risks if you are exposed. Most
mines or sites are located int the thick woods & you will will most likely be bit by one (many is more likely) if you are not
protected. So buy some bug spray with deet & sprays yourself with the "bug shield". It will greatly reduce the chance of being bit.
Also wearing long clothing will help. This ranges in price from 4-10 dollars.
- Knee pads: Knee pads will greatly protect your knees from sharp rocks that could damage your knee, if that were to happen walking
would be a large problem. They are inexpensive to buy & will greatly help you. They range in price from 5-40 dollars.
- First aid kit. Simply indispensable. This is useful no matter where you go, always have one with you on the trail & a more
extensive one in the car. From cuts to breaks, it will always come in handy. They range in price from 15-40 dollars Canadian,
depending how well stocked they are.
- Tough work gloves: the best are ones that are made of leather, they can shield you much more from scrapes but are a bit stiffer.
They are an essential tool as you will use them VERY often. They cost around 5-60 dollars, depending on the quality & toughness.
These tools are all designed to keep you safe, so use them & you will feel much better. You safety is very important so don't take any shortcuts with your life. In the wild only the prepared survive.
Radioactivity
This is more for the advanced collector but there is a good chance that a beginner will accidentally pick up a radioactive sample with ought their knowledge. As with all dangerous elements you must be aware of the dangers when handling such samples. A very important precaution is just to avoid the radioactives, there are many crystals out there that are just as interesting & are much safer. Here are some precautions when dealing with radioactives.
1. If you do have radioactives, never cut the piece & inhale the dust. THIS is extremely dangerous as you can develop very serous health problems from the radiation exposure & the poison of the radiative elements. Always wear a GOOD respirator when dealing with radioactives, this goes the same for asbestos minerals.
2. Wash hands after handling radioactives, & never eat & keep food close to radioactives also.
3. Never keep radioactives in a place that you eat, spent a lot of time such as a bedroom or living room. Its probably just safer to keep them outside of your house.
4. Limit the amount of time you handle the piece & that you spend at a mine that has elevated radiation levels.
5. Try not to store radioactive in a tightly closed boxes as this will allow for a dangerous gas, Radon to build up. Keep the box away from your home & well ventilated.
6. The best advice here is: Don't Collect Radioactive minerals as they are an unnecessary danger.
Here is a link to a good article by Allyson Rowan that explains radiation & minerals with much more detail. It is encouraged that you read this article. Just copy the link into any window.
http://www.nexus08.clara.co.uk/article.RadioactiveMineralSpecimens.A4.pdf
Now you might wonder why the hell would anyone want to collect radioactive's, when you read all the warnings above & in Allyson's article. Well a few reasons are that radioactive are in their way somewhat rare, especially well formed crystals such as Thorite, Euxenite-Y, Betafite, & Uraninite. Despite of their rareness its still best to avoid them, as they require considerable knowledge, preciousness, & maintenance. There are plenty beautiful crystals out there that are not radioactive. When you collect radioactives you are playing with Dragons. But of course some of us will anyway. Know the risks.
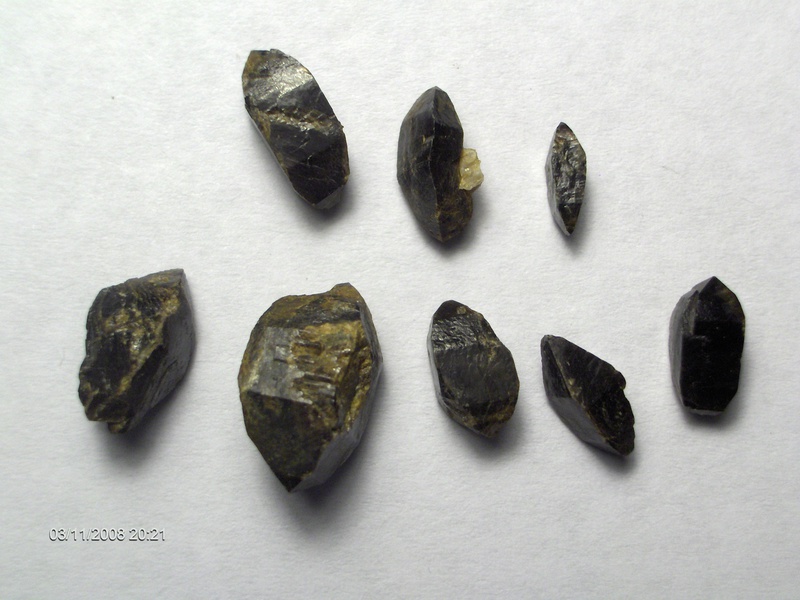
Here are some picture of radioactive minerals:
Uraninite (black cube)
Betafite (usually as brown/black octahedra)

Euxenite-Y (brown/black Orthorhombic crystals)
Uranophane (yellow Monoclinic needle elongated crystals)

Zircon (mildly radioactive usually)(yellow, black, brown, red, pink, Tetragonal crystals)
Uranothorite (mostly shapeless, crude & earthy brown)
Fluorescent Minerals
This is a relatively new hobby when compared to the field of collecting. Fluorescent mineral collecting can be one of the most enjoyable ways to collect as you are dealing with relatively safe minerals. These minerals usually have limited harmful elements & no radioactivity. In order to collect florescent you must first locate a place that has them, since they are a bit harder to find then regular minerals. One way to search for them is to just type into your search engine, for example: Bancroft, Ontario, fluorescent minerals. Modify this search as best you can to fit your home area. Once you find an area you must decide what kind of lamp you need. In order to collect florescents you need a special Ultraviolet lamp. These lamps come in short, medium, & long wavelengths. The wavelength will affect what minerals flouress. The best lamp to start with is a short/long wave combo lamp. If you are low on cash, go with a short wave lamp as most (about 90%) of fluorescent mineral glow under short wave light, the remaining are mostly under long with a bit under medium. You can buy a large field lamp to carry with you or you can buy smaller flashlight size UV lights. The difference of course is power, a larger more powerful lamp will make more minerals glow from a distance while a small flashlight will require you to be very close to the mineral to get a reaction. UV lamps are not cheap, be warned. They range in price from the small flashlights starting at $35-80 Canadian, & the larger field lamps from $200 to over $1000 for good powerful display lamps. Its quite a commitment but it can be a very fun way to collect. So you got the lamp, now what you do. You can get florescents 4 ways: buy them, trade for them, look for them at night at a site, or look for them during the day under a light proof tarp at a site. If you choose to collect at night always collect with someone else, & make sure you have visited the site at daylight before. You do not want to get lost or disoriented at night. Always walk noisily & with purpose to warn wild animals of your presence, so they can bolt before you encounter them. It would be recommend that you have some kind of weapon when exploring sites at night just in case you encounter a vicious wild animal, as they are more active at night. Also don't wear clothes that you cooked food in, it might attract animals to you as they can smell the food on it. Collecting at night has additional dangers but you will be able to see minerals very clearly. It is HIGHLY recommended that a beginner will not collect at night because this requires some experience & knowledge to be there safely. Only collect in this way if you are part of a group that is knowledgeable in the outdoors & have collected at night multiple times, NEVER go alone. One way that a beginner can collect is during the day & using a light proof tarp. You can buy a tarp or you can make one by gluing a number of garbage bags together with duct tape so they block the light. The tarp should be at least 10 x 10 feet to cover you effectively. Whey you go to the site, cover yourself with the tarp so all light is blocked while you are over the minerals & you turn on your light & collect what glows. Easy. In order to use the larger UV field light you will need some kind of power pack to bring with you. This is another thing to carry, as fuel cell is quite heavy. If are on foot or on a bike it can be a pain, but that is one of the costs of collecting in this way. Always wear special UV goggles to protect your eyes from the UV light. That is basically what you need to know about florescent. I consider this to be an advanced aspect to the hobby so i would not recommended this to beginners but who knows you might want to give it a try. If you are interested in UV lights & want a bit of knowledge about them give this site a try: http://www.mineralman.net/index.html they carry a wide assortment of UV lights, you can look at the prices to give you some idea how much they cost, & the site will you give a bit more info on UV lights. Take a look & see if this for you. Collecting florescents can be a unique aspect of the hobby, as you can easily see the samples glow & it is much easier for others to be interested & appreciate your rocks when they see them glow. It is a unique experience.
Here is a picture of a Shortwave UV field light in the middle, with a power pack on the left & a small flashlight longwave UV light on the right.
my UV lights
Here are a bunch of florescent mineral that i have found at the CN dump, Morrsion Quarry, & bought from New Jersey & other locations. The UV lamp produces the soft glow on all white/whitish surfaces reflecting the light a bit. Always wear special goggles when you look at flourescents.
flourescent minerals
Now lets talk about mine Dangers
Mine Dangers
Most mines are dangerous places as there are hidden underground workings, adits, and steep slopes. The danger is there that you may fall into an underground tunnel as most mines are abandoned & have a greater risk to collapse. Also if you venture into a tunnel it could collapse, or you my be exposed to dangerous gasses such as radon or fallen timbers, or sharp corroded metal. One other thing regarding tunnels & adits. If you venture & explore them very early spring or fall you should be aware that there is a danger that you might encounter a wild animal hibernating in the tunnels. Bears like to hibernate in old tunnels & adits, so there is a chance you can encounter one. To be safe, just avoid such tunnels & adits & keep your ears open when you are near such structures. It would be a good idea to read up on safety when encountering a bear, its is a possible encounter & you must know what to do in it. Bears are generally scared of you more then you of them but they can be dangerous if threatened or backed in a corner or surprised. Just do some research into bear encounters. You are in the wilds, remember that. Here are some points regarding bear:
- they are attracted to strange noise, such as radios, singing, & musical instruments
- they are attracted by food smell, don't wear the clothes you cooked food in, they will still have the smell.
- if you encounter a bear, back always slowly, never run & climb a tree they are both great climbers & runners over short distances.
These are some very basic points regarding bears, preform more research on encounters with them to be better prepared should you encounter one.
Another danger is with old rock dumps. They can be steep or very unstable. Never climb one because you can create a rock avalanche that could crush you or seriously injure you. Avoid the ledges & keep to safe & stable areas. The same goes for mine edges, cliff walls, or rock walls. Don't venture to close from both the bottom & the top, always safety goggles, steel toe shoes, & a hard hat.
Be careful as you walk on rock dumps, it can be very easy to slip & injure yourself. Walk slowly with steel toe shoes & don't carry too much weight, also don't jump, you can easily trip & ruin your trip & health.
Do not underestimate mines, they are dangerous & should be treated with respect.
One last point regarding safety i want to mention is regarding private property
Private Property
Always respect owners rights. Private property is private property, owners will not take kindly to trespassers. If you see a private property sign or no trespassing, don't trespass. If you really want to visit the mine try contacting the owner but never trespass. If you trespass you can be charged or worse. You would not want someone trespassing on your land would you?
Another thing to keep in mind is minerals rights on land. There might be no house on the mine you enter but someone might have staked the land & owns the mineral rights to that property. Collecting here is absolutely forbidden so keep in mind that such claims are located throughout land of old mines & mineral rich territory. If there is no sign on the property its difficult to know if any mineral claims exist but you will see markers. If you want to be really sure try contacting the nearest town office, archive, library, or natural resources office they will have information regarding mineral claims. Also look at the local geological website of the town or region, they might have info on what property has been claimed. Preform some research online into mineral claims, as this is an important subject that all rockhounds must be aware off.
Hunting Seasons
Just a quick note about hunting seasons. Some mines that open to collectors may be closed during hunting season. Before you visit a mine you should be aware of hunting seasons in the state or province that you intend to visit. Some collecting spots in Ontario are closed especially during deer hunting season, two sites that close at this time are the Burgess Mine in Boulter, & the Bessemer Mine in Bessemer. People who own these properties will not take too kindly to trespassers, as they trespass for one during prime hunting season, they disturb the game, & they risk the hunter shooting them by accident, & there is also the risks of stepping on a snare or trap. Just be aware of hunting seasons, as the danger from hunting in the area can be an issue to your safety. If you choose to venture during hunting season, wear lost of orange so you can be clearly seen by hunters & make sure you are not going to a site that forbids hunting collecting.
Transportation Method
This is just a quick note about transportation to sites. As you might have guessed it a 4X4 vehicle will make more sites easier to access for you, as most old mine roads are TERRIBLE, if you ever been to Bear Lake Diggings then the last portion before the site is such a road. Do research on a site, you might find that the road is unsuitable to your kind of vehicle and you might have to walk. If you have to walk, decide if you are willing to walk the distance. It could be too long. Do the research so that when you arrive you don't get a big surprise. Walking to sites is usually what happens so be prepared for it.
Weather & Electronics
I just to mention briefly that you must also keep in mid the weather conditions when you go out collecting & its effects on your electronic equipment. My main point here is regarding a GPS. If the weather is very moist & raining the moisture can build up in your GPS and cause it to malfunction or shut down. Always keep your GPS covered or at least limit the amount of exposure to rain when you look at it. Another issue is cold weather, it can deteriorate your batteries and decrease their charge greatly. when you are traveling to your site always keep the batteries with you, not in the trunk where they are cold. Better they stay warm and last longer. The same goes for your camera. It is also best to have new batteries, not rechargeables which have a lower charge to begin with. If your battery's are too cold they can cause your GPS to shut down randomly. Could be a big problem during a long hike. Also if you have an already weak battery the cold could cut its life & your estimate of its charge can cause to you loose your GPS's power source half way to the site, or back. Simply have extra new battery with you when you head out, and keep them out of the cold as much as possible.
As i mentioned some basic info that you should be aware off here are some classification of mineral collectors.
Now I will briefly mention different levels of mineral collectors, the difference is basically equipment.
Level 1: Beginner Rockhound
At this stage you most likely will have very few literature with you, most likely just one or two mineral book. You will probably visit only a few sites on your first expedition & those that are probably easy to access. Your list of tools will most likely be:
- rock hammer, mallet or hammer, bucket, boots
- chizzle
- 1 or 2 collectors book
- 1 mineral identification book
As soon as your visit your first site you will begin to leave this stage to the next stage.
Level 2: Intermediate Rockhound
Here is where you consider exploring other sites then your first one or two that you did when you begun your hobby. Your list of equipment will grow just a bit, as you most likely will explore only once a year. Your list of tools will most likely be:
- rock hammer, mallet or hammer, bucket, boots
- chizzles, one larger then the other
- 1 or 2 collectors book
- 1-2 mineral identification book
- performing more research
The only difference is that you now consider mineral collecting as your hobby but you perform it very occasionally, this means that you will stick to the hobby & not just try it out as in the first stage. The next stage is one that most rockhounds are in.
Level 3: Rockhound
Here you consider your hobby to be much more then just a small thing you do once & a while. You consider it more seriously & you respect the risks involved as mineral collecting as it is a bit of a risky hobby. Here you do a lot of research, chat with other collectors through phone or internet, & you go collecting multiple times a year. The vast majority of your time is spend on research of sites, mineral cleaning & preparation, & display & identification. As you might have guessed your list of equipment has grown substantially. Here is what my list of equipment is for this stage:
- rock hammer, mallet, sledgehammer
- thin chizzle, large cold chizzle with guard, extra cold chizzle.
- Large & small bucket
- Small trolley to carry bucket & tools
- GPS
- Geiger counter
- Short & Long Wave portable lamps with power pack
- Digital camera to take site pictures & later mineral images
- Night vision goggles for night UV mineral collecting
- Utility vest & load bearing vest with multiple pockets.
- Topographic maps
- A lot of mineral literature, guide books, site info
- Measuring tools
- Survival gear, knives, axe, fire starting tools.
- Multiple flashlight
- Binoculars
- Bug replant, bug hat
- Knee pads, leather gloves, & work gloves, safety goggles, dust mask
- Old jeans, shirts, & jackets
- First aid kit, survival & first aid book
- Boots & wadders. Etc..
I wasen't kidding about it growing now was i?
As you can see, I take my hobby very seriously & I hope that you will too. I have massed my trove of equipment over many years not just bought all of them at once. Keep in mind that you might be going to old mines & abandoned locations far from a road & civilization. That is why I have all this gear, if you are prepared nothing will go wrong that you can’t come over & emerge victorious. You must be prepared, & take with you all that you need, nothing more. If you take too much all you will have is extra weight. You must research your site, see if you need specialty equipment, UV lamp, Geiger counter, sledgehammer. If you bring them, they only will tire you & limit how many samples you can take out. This can be a big problem if the site you explored is a far to walk too & over rough terrain. I usually take A VERY small amount of equipment with me when I go to the actual site, most will stay in the car. If you are going on foot, weight is a great factor.
Also after you have been collecting for a while, its is inevitable that your collection will start to get a bit “big”. As such you probably will begin to specialize. This means that your will just stop looking for any minerals, you will focus on a few that have a number of properties you want. These properties could be: Radioactivity (as in Uraninite, Thorite, Betafite), Fluorescence (as in Flourite, Calcite, Hackmanite, ), Magnetism (Magnetite), Micro crystals, a specific mineral (such as Corundum, Apatite, Sodalite), or simple well defined crystals (as in Corundum, Zircon, Scapolite, Apatite). You could also mix a few categories, for example these days I try to collect: fluorescent minerals, well formed radioactive crystals, well formed non-radioactive crystals, & any large crystals. Of course on of my goals is to find as many different species of minerals I can, but I won’t mass massive piles of each, only a very select number of samples. I am just starting to specialize mainly because of the boxes upon boxes on minerals that i have, room is starting to be an issue.
Now, when it comes to purchasing specialty equipment a very good place to shop is Ebay. There you will be able to find a Geiger counter, rock picks, UV lamps, GPS, any anything else you can think off. But don't limit yourself there, shop around especially for expensive items like a UV lamp.
I want to mention a quick point about Google maps. Remember this name, this application of Google can be a miracle research & planning tool. You can use it to zoom in to an area where a mine is & plan your adventure. Also another very useful feature is the distance calculator, this can help you locate a site if you only have a distance from a point to work with. You can also type in GPS coordinates to see mines or locate yourself after your adventure. This is a great way to explore your search. Another good tool is NASA's WorldWind, this application allows you to zoom into any area of the Earth & you can look upon an area topographically allowing you to see the hills & terain of the site from a bird eyes view or from eye level. Give it a look, you might like it.
Don’t forget to search your states or provinces Geological Survey website. They have a wealth of information on minerals, mines, & collecting potential around where you live.
Always be careful when you visit a new site & you should leave info with someone where you plan to go if you travel alone. Keep in mind that you might be in the wild & on private property, so be careful & respect owners. Most will not take to kindly to trespassers. Be safe & take no risks, this is a hobby not combat.
Resources
Here are some good books, sites, shows, & other literature that can help you get more information an all aspects of the hobby and additional knowledge that you should have.
Fluorescent Mineral Collecting:
-websites
1.) Mineral Man ( a good site with basic info on fluorescent mineral, lamps, and accessories)
http://www.mineralman.net/index.html
2.) The Fluorescent Minerals (good info about what is florescence)
http://www.galleries.com/minerals/Fluoresc.htm
3.) Fluorescent minerals (good site with mineral samples)
http://wordcraft.net/fluorescent1.html
- books
1.) The World of Fluorescent Minerals, by; Stuart Schneider
2.) Collecting Fluorescent Minerals, by; Stuart Schneider
Radioactive Minerals:
-websites
1.) Radioactivity in Minerals (good site with info on radiation & minerals)
http://webmineral.com/help/Radioactivity.shtml
2.) Naturally Radioactive Minerals (partial list of radioactive minerals)
http://www.survivalunlimited.com/radioactivemin.htm
3.) Radioactive Mineral Samples (a basic PDF file explaining handling procedure)
http://www.nps.gov/history/museum/publications/conserveogram/11-10.pdf
-books
1.) Introduction to Radioactive Minerals, by; Robert Lauf, PhD (good introduction to the topic)
Wilderness Survival:
-websites
1.) Wilderness Survival (very comprehensive site on wilderness survival)
http://www.wilderness-survival.net/
2.) Survival topics (up to date info & many survival techniques)
http://www.survivaltopics.com/
-books
1.) SAS Survival Handbook, by; John Wiseman
2.) Survivial, by; Department of the Army Field Manual 1970
3.) Survive!, ;by Les Stroud
Shows:
1.)Kirsten Gum: Treasure Hunter (probably one of the only shows that had anything to do with rockhounding out there)
2.) Survivorman (mainly to do with wilderness survival under likely circumstances, quite realistic conditions)
So here is some info, hope it helps.
Enjoy your new hobby, & take care. Rockhound Safe & with Determination.
Reference: Allyson Rowan, Here Be Dragons or the care & feeding of Radioactive species, article.
Article has been viewed at least 78462 times.


Burleigh Falls barite occurrence, Burleigh Township, Peterborough County, Ontario, Canada