Making Labels for Mineral Specimens
Last Updated: 16th Jun 2013By Rock Currier
Making Labels for mineral specimens
A reason for making good labels from a scientific perspective
A long standing problem in the scientific community relating to mineral and rock specimens is that during the preparation of professional publications, and the creation of masters and doctoral theses, suits of well studied mineral and rock specimens are created. These tend to be left behind in the educational institution once the researcher moves on, retires or dies. Depressingly often, these collections of intensively studied specimens are not well labeled and are thrown out. I propose that guidelines be established in earth science related departments that require that these specimens be well labeled and that the data relating to these specimens be uploaded to a web accessible database. This will go a long way to preserving the "half life" of these specimens. Unless researchers can find out that these specimens even exist, their days outside of a land fill dump are limited.
Making Labels for mineral specimens
Making good labels for mineral specimens is not a trivial task and can be very time consuming if you don’t have modern computer programs, printers and other equipment to help you with the task. Also you will find that one size label is not suitable for all specimens. Micromount labels have severe space limitations compared to their cabinet size cousins. If you want to label your collection well and attractively, I have set out below what I believe is an ideal way to do it and the reasons why I recommend you do it that way. This is more or less the culmination of trial and error experiments in cataloging my own collection during the last 50 years where I was challenged to label and catalog all kinds and sizes of specimens in my personal collection (~20,000 specimens) and to create various kinds of labels for my wholesale mineral business.
Historically
Before I start talking about what I believe to be an ideal way to label specimens, I would like to talk about some of the ways it has been done in the past. Historically most museums and many collectors have placed little numbers on their specimens. Often a little oval or rectangular patch of paint, usually white, has been painted on the specimen or on a little patch of putty that has been placed there to create a little flat surface. On this platform or a relatively smooth, non-obvious spot on the specimen is painted with a brush or a pen the number of the specimen which corresponds to a a catalog entry. More recently, the numbers have been printed on paper either manually or by a printer and glued on the specimen.
About 50 years ago when I was getting started, Fred Pough, a former curator of the American museum, observing my rudimentary labeling techniques, admonished me to make sure the little colored patch that I was preparing for the numbers should be rectangular rather than oval. I suppose this little nicety, perhaps a bit reminiscent of dedicated monks illuminating their manuscripts, might demonstrate to future generations the veneration that was held for the specimen. I never could bring myself to take the time to prefect this technique and my number swatches were usually some sort of a ragged oval. The number that is written on this usually oval or rectangular patch corresponds to a number in a ledger or a card catalog. The numbers are usually listed sequentially from smaller to larger, making it easy to locate a particular specimen record. The numbered catalog entry contained the details like the species on the specimen and its locality etc. After years of doing it this way, the advent of computers and printers eventually suggested to me that if you were going to go to the trouble of putting these little number labels on your specimens, it took very little additional work to put the species and locality on the specimen as well as its catalog number.
In addition to the number patch on the specimen it has also been customary to make up some sort of label that is to be kept with the specimen that usually contains at the top of the label the names of the mineral species present on the specimen, its locality the the specimen number and the name of the institution or collector. This has been the time-honored way of cataloging specimens and has much to recommend it, not the least being its simplicity and ease of use. You will see that I have borrowed and refined many of these traditional methods in pursuit of a better way to catalog specimens.
Ideally
How much of what I recommend here you will decide to use for your own cataloging and label making purposes, will, to some extent, depend on your preferences, your pocket book, and to the amount of time you can bring yourself to devote to cataloging your specimens. But whatever you end up doing, doing something is better than doing nothing. Do I need to dwell on the reasons, financial if nothing else, of why you should catalog your collection? I think not. If you have read this far you probably have guiltily come to the conclusion that you should do something or improve the system, if any, you currently use.
Life-Saver Labels
For specimens larger than thumbnail size specimens you should make two different kinds of labels. The first and most important is what I call a life saver label, a small label that you glue right onto the specimen.
The reason that these life saver labels are so important, is that historically it has been shown that labels have a habit of getting separated from their specimens. When this happened the specimen is in jeopardy. The identity of the mineral can always be determined by analysis, but if the label is lost the locality information is often gone forever. The best that can be done in such circumstances is to attribute a locality to the best guess you or someone whose judgment you trust can make. If a specimen falls into the hands of someone that doesn’t know about minerals, the specimen is often regarded as just another rock and after a while it becomes a dirty rock and then a dirty broken rock once the kids play with it for a while, and then it is thrown out. If it has a label on it telling what it is and where it is from, that will often be enough to alert a non-knowledgeable person that it may have some value and be worth preserving. Example: There was one well know mineral collection that was being moved from one institution to another. A janitor/maintenance man was assigned to pack up the collection and he unilaterally decided it would be a lot neater and more efficient if he took all the labels out of the boxes and put them in a separate box before he packed up the collection. There were thousands of specimens of ore samples and specimens from little known or old localities. You can only imagine what a nightmare it was to try and make right this blunder that could never adequately be corrected. Example: look at the Identification forum on Mindat and count up the number of request where people attach pictures of their specimens to their posts and ask “What is this thing and where is it from?” Do you need more examples?
The life saver label takes the place of the little number labels that have been painted or glued onto specimens in former years. This little label, which you can generate on any printer linked to a computer, should have not only the specimen number on it but also at a minimum the locality information. Some of my friends have handwritten these little labels which is not only has the drawback that it is very time consuming, but also, as they get older their unsteady hands can no longer inscribe the tiny letters and numbers necessary, and they have stopped hand writing their labels and switched to computer generated labels or stopped cataloging altogether. So it would appear that computer printing is increasingly the way to go. I would also recommend that you put the species and your name or the name of the institution on the the "life saver" label. Don’t use any print font smaller than 5 points. If you use a smaller type font, many people will need a magnifying glass to read the label. If you can use a minimum of a 6 point font. It is more readable and usually small enough to allow you to put all the information you need on this kind of label.


The live saver label above is 16mm across. The black on yellow number on the bottom of the Colemanite specimen to the right is typical of the traditional style cataloging. The brass scale below the Colemanite specimen on the right is an inch with a rule at one cm.
Box or Tombstone labels.
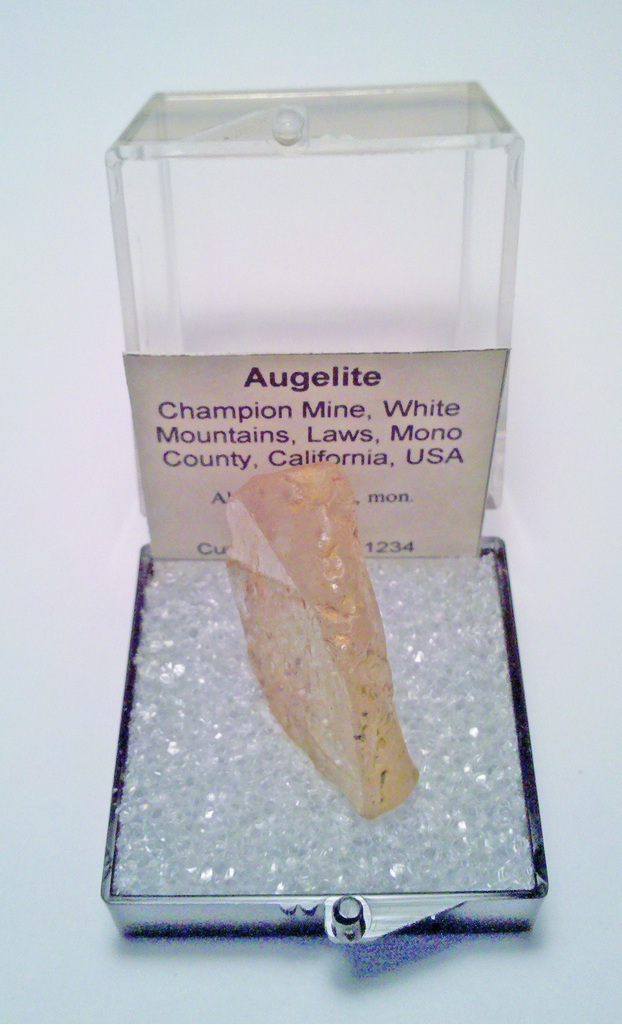
You should also make up a box label for your specimen. These are sometimes called tombstone labels because they commonly stand up against one wall of the box like the tombstone at the head of a grave. The reason for this additional label is that most of your specimens will likely be stored in boxes. The species and locality information should be places as high up on the label as you can manage. This makes the information easier to read when the specimens are viewed in their boxes. If this information is placed further down on the label you will usually have to take the label out of the box to read it or at least roll the specimen out of the way a little to be able to see the information. The less you move or touch a specimen, the less damage it will suffer over the years.
You can also place anything else you want, on these labels. I also place the chemical formulas and crystal system information on my label because I was trained as a chemist, and the formulas tell me immediately what kind of minerals I am dealing with and whether they may indicate if need any special handling or not. For example, If they contain U, I know they are radioactive and if they have Cu or Ag I know they contain copper or silver and if they have more than ten or fifteen molecules of H^2O they may be water soluble and or unstable. If you don’t know chemical notation or the abbreviations for the elements, then this information will not mean much to you but others who do know will think it a kindness that you have provided it for them. You might also considering adding information about who you got the specimen from, its measurements, its weight, even a picture of the specimen, or anything unusual about the specimen on the label. What you can place on a label is limited only by the size of the label and the size of the font you are using. Here is an example of a box/tombstone label that I use for my own collection.


On the left is a box label as printed. When the back is folded down you can use it as a sandwich board kind of stand alone label and as a tombstone label in a box. I use three somewhat different sizes of these labels to accommodate larger and smaller specimens in various size boxes.
If you are using a modern database-cataloging program, you may be able to print out labels containing all or a subset of the data in the database on a label or report. I choose what information to put on the label and design the label accordingly. Once the label template has been created, printing consists of just pressing a few buttons. It takes more time to cut out the labels than it does to print them.
Display Labels
A display label will be used when a specimen is placed on display somewhere. However the majority of specimens will never be placed on display, but will remain in their boxes. The data on a display label will usually be centered on the label and distributed evenly on the label from top to bottom. In a pinch you can use the box labels for this purpose if you wish.

What to put on your labels:
You can put anything you want on your labels, but historically it has more or less been agreed that a minimum you should put the name of the species and the locality. If nothing else you should put the locality. You can always analyze the minerals on the specimen to find out what they are, but in most cases there are no tests you can run to determine where the specimen came from.
Species
Sometimes specimens have only one species, such as a single crystal of calcite. Most of the time however, there will be more than one species on the specimen, and sometimes many. You don’t need to put them all on the label, however I would recommend that you put the names of the easily visible species on the label and the name(s) of significant rare species even if they are not easily seen. For those not easily seen it is a kindness to those who come after to also put on the label as well as a note that will direct an interested party to them. For example: Connellite (micro blue prismatic xls.). Usually there will be species on the specimen that you are not sure of, like minerals in the matrix of the specimen. Its better not to guess, just leave them out. You can always put your speculations in the cataloger entry.
Locality
Historically only the name of the major species on the specimen is written on the label and a minimum of locality information, like Chihuahua, Mexico. Ideally however the locality information should be detailed enough for someone to copy it and then go and find the place where the specimen came from. Example: Sérandite, Quebec, Canada. This is not very helpful. Much better would be: Poudrette quarry, Mont Saint Hilaire, Rouville, RCM Montérégie, Québec, Canada. Or perhaps even Poudrette quarry (Demix quarry; Uni-Mix quarry; Desourdy quarry; Carry Mont Saint-Hilaire), Mont Saint Hilaire, Rouville, RCM Montérégie, Québec, Canada. The portion of the label in parentheses are the names that the quarry has had in the past under various owners.
As I have noted before locality information is the most important information that should be associated with a specimen. After the species information which can always be recovered by analysis, the locality information gives a specimen much of its scientific value. Did the sphalerite come from a vein deposit in Colorado or skarn deposit in Siberia? Such information allows scientists and knowledgeable collectors to appreciate the specimen in its geological, mineralogical and geochemical context, determine its paragenesis, make inferences about how it was formed and where similar material may be found elsewhere. Once locality information is separated from the specimen and, God forbid, lost, much of the scientific and often monetary value is gone as well.
Advice about paper, ink, glue, lacquers and printers.
When you make labels you should use paper that is best suited for the purpose. When making box or display labels I would recommend you use a heavy, durable paper like card stock of the acid free or archival kind. If you use a paper that is commonly used for printers, it may not last and will be more prone to yellowing, decomposition, tearing and inadvertent folding. For the little labels you glue right onto your specimens I would also not recommend normal printer paper but a slightly heavier paper. I would recommend something like an 80 pound paper. I use Brilliant White, Astropaque paper. It can’t hurt if the paper is acid free or of archival grade. If you use the normal weight copy paper, when you glue it onto your specimen it will often become somewhat semi-transparent, and that will often make the print more difficult to read than it should be. A somewhat heavier paper will retain more contrast with the black print.
Ensure that the ink your printer uses is not water-soluble. Some of ink-jet printer inks will run and blur if they get wet, at least some of the inks originally used in ink jet printers would do that. The black ink used in most laser printers seems to be of good quality and fairly permanent, although I suspect that we won’t know for sure for at least another 50 or 100 years. Black ink is always recommended because it is usually “carbon black” based and one of the most stable colors.
Colored inks are dye based and prone to fade over time or react with acid or chemicals in the paper. For example we now know that India ink is a good long lasting ink because documents more than 100 years old written with that ink are still very readable.
I would recommend that you use common household white glue to fix the specimen labels to your specimens. If you wish, and it can’t hurt, use an archival quality white glue that is pH neutral. I would recommend that you not use a more permanent glue such as an epoxy glue because they can with time turn yellow and at some time in the future, you or someone else may wish to remove the label and it will be a lot easier to do if you use a water soluble white glue. When you glue your specimen labels onto the specimen, the paper can be a little stiff and not congenial to accommodate itself to the often rough surfaces of most specimens. To overcome this little problem, I would advise making the label wet and this will allow the paper to more easily to conform to the rough surface of the specimens when you press it home. This technique does not work with volatile solvent-based glues like Duco cement. I just put the label on my tongue for a few seconds and this softens up the paper. Then I put a little white glue on the back of the label and gently press it home on a non-prominent spot on the specimen. For heaven’s sake, what ever you do, do not pick out a nice flat space on one of the prominent crystals and glue the label there. I have seen this done on occasion where a volunteer cataloger was told, without any instruction, to put numbers on specimens.
When you have finished gluing the specimen label on the specimen and everything has dried, I would recommend that you cover it with clear fingernail varnish or a clear polyurethane lacquer/paint. Some people cover the label with a thin film of the same glue that they use to glue it to the specimen. The important thing is that after covering the label that when the glue dries that it does not make the labels difficult to read. This will more or less seal the toner into the paper and allow you, when it has dried, to wash your specimen with soap or water or in an ultrasonic cleaner without having to worry too much if the ink will wash out or of the label will separating from the specimen. If you wash the specimen a lot or leave it in water for an extended time, the white glue may dissolve and the label may separate from the specimen in spite of how well you thought you sealed it with lacquer. However for most cleaning purposes, the above method should prevent this from happening.
Exceptions
Some minerals are water-soluble and using a water-soluble white glue may not be suitable. Try and use white glue on a mineral like sulfohalite and you will understand immediately why this will not work very well. In such cases you may need to resort to using a non-water-base glue or just not try and glue labels on such specimens. Many borates are considered to be evaporate minerals even though you can wash many of them with soap and water without harm. You can, however, glue labels onto them with white glue without any problem. In some cases, where you are not sure how the mineral will react to a water-based glue, you will just have to experiment to see what will work.
Very small specimens
Sometimes, if a specimen is very small, gluing any kind of label on the specimen is a challenge or impossible without covering up part or most of the specimen. Sometimes just painting a small number on these specimens may be about as good as you can do, but there is an alternative I have found that works. You can put a tiny drop of glue on the specimen and glue one end of a short length of thread to the specimen. On the other end of the thread glue a little specimen label. Commonly for small specimens, collectors will often fix them on a small base of some kind and or place them in a little plastic box. This is commonly done for micromount and thumbnail specimens. Once they are in a box, you can glue or place the label on or in the box, and all is well.

Above are two different kinds of labels for thumbnail specimens (often abbreviated to TN). On the left above you can see a thread that has been glued to the little chrysoberyl at one end and to the specimen number label on the other. Instead of using a hole reinforcer as a label, you can just fold a small lifesaver label around the other end of the thread. The TN on the right is in a little plastic box that is known, especially in the western part of the USA as a Perky box, named after Willard Perkin who originally made used them for his own specimens and then popularized and sold them to other thumbnail collectors. In this case the little card stock label slips down between the Styrofoam insert and the back of the base so the label will be displayed against the back wall when the box is closed.


Micromount labels are the hardest to make because the labels have to be made small enough to fit the boxes in which micromount sized specimens are usually stored. On the left is a micromount label just cut out of a printed sheet. To give an idea of the size, the metal scale at the bottom of the first image is an inch long with a mark at one cm. At the top are two label strips that go on the top of the box. The larger bottom part is glued on the bottom of the box. I print these labels on Avery self-adhesive labels so all I have to do is cut them out and press them onto the box. There is some question about how long the stickum on the back of these labels will last before drying out and the label begin to flakes off. A collection of micromounts I bought some years ago used stick-on labels. The collection had survived many, very dry and hot Arizona summers and some of them had begun to flake off the plastic. Avery says it has no data on the longevity of the adhesive on its stick-on labels and an archivist at the Getty Museum in Los Angeles indicated that they don’t have any idea either. Some of these "experts" seem to think that the more modern adhesives used on these stick-on labels have a greater longevity than the earlier ones. I suspect that we won't know the truth about these "modern" adhesives for another few generations.
Historically, micromounters have usually used hand-written labels on their micro-boxes, but as the years pass their writing often becomes harder to read because they are less able to print clearly. Also, even if they are some sort of calligraphic genius, their writing will never be able to match the clarity of printed labels. It would be difficult to write chemical formulas like the one on the right above with that degree of clarity. You can print about twice as many characters on printed labels as you can by hand printing.
If you wish, you can even print a picture of the specimen on the label and almost anything else as well.


You can also print on the same sheet small specimen labels one of which you can glue onto the specimen. You can take this long, ungainly label and fold it twice and it will look like the one on the right and will serve nicely as a box label.
Notes on labeling rare species.
Often when viewing collection of rare mineral species you will note that there are lots of little paper arrows glued on the specimens. These arrows are presumably pointing to the species of interest on the specimen. Such specimens are sometimes called arrow rocks. The reason for this is that frequently rare species are very non obvious, the crystals small and often present on the specimen in only one to two tiny spots. It is sometimes joked that the species is so rare it isn't even on the specimen. Often these arrows are only pointing in the general direction of the rare species, and even observing the area that the specimen under a microscope, it is often not obvious exactly which mineral it is that the arrow is pointing to. It is good to have these arrows, but make sure that they are pointing as closely as possible to the species of interest, and in addition, make note on the box label and the specimen label if possible just what the arrow is trying to point out. Example: Arrow is pointing to tiny blue crystals. These arrows can be made simply by cutting them out of paper. Some people use a reflective material like tin foil or colored paper. You can glue them on with the same glue as you use to glue on the specimen label. Some people use a tiny bit of "earthquake tack" on the specimen and then press the label down on that to fix it to the specimen.
What I have presented above comes from many years of trial and error and what seemed to be incremental gradual improvement. Although I have tried to include everything here, I am sure that there are many of you who may be able to recommend other or better ways to make labels. If you can suggest improvements, please make your views and experience known, so your ideas can be included here.
A reason for making good labels from a scientific perspective
A long standing problem in the scientific community relating to mineral and rock specimens is that during the preparation of professional publications, and the creation of masters and doctoral theses, suits of well studied mineral and rock specimens are created. These tend to be left behind in the educational institution once the researcher moves on, retires or dies. Depressingly often, these collections of intensively studied specimens are not well labeled and are thrown out. I propose that guidelines be established in earth science related departments that require that these specimens be well labeled and that the data relating to these specimens be uploaded to a web accessible database. This will go a long way to preserving the "half life" of these specimens. Unless researchers can find out that these specimens even exist, their days outside of a land fill dump are limited.
Making Labels for mineral specimens
Making good labels for mineral specimens is not a trivial task and can be very time consuming if you don’t have modern computer programs, printers and other equipment to help you with the task. Also you will find that one size label is not suitable for all specimens. Micromount labels have severe space limitations compared to their cabinet size cousins. If you want to label your collection well and attractively, I have set out below what I believe is an ideal way to do it and the reasons why I recommend you do it that way. This is more or less the culmination of trial and error experiments in cataloging my own collection during the last 50 years where I was challenged to label and catalog all kinds and sizes of specimens in my personal collection (~20,000 specimens) and to create various kinds of labels for my wholesale mineral business.
Historically
Before I start talking about what I believe to be an ideal way to label specimens, I would like to talk about some of the ways it has been done in the past. Historically most museums and many collectors have placed little numbers on their specimens. Often a little oval or rectangular patch of paint, usually white, has been painted on the specimen or on a little patch of putty that has been placed there to create a little flat surface. On this platform or a relatively smooth, non-obvious spot on the specimen is painted with a brush or a pen the number of the specimen which corresponds to a a catalog entry. More recently, the numbers have been printed on paper either manually or by a printer and glued on the specimen.
About 50 years ago when I was getting started, Fred Pough, a former curator of the American museum, observing my rudimentary labeling techniques, admonished me to make sure the little colored patch that I was preparing for the numbers should be rectangular rather than oval. I suppose this little nicety, perhaps a bit reminiscent of dedicated monks illuminating their manuscripts, might demonstrate to future generations the veneration that was held for the specimen. I never could bring myself to take the time to prefect this technique and my number swatches were usually some sort of a ragged oval. The number that is written on this usually oval or rectangular patch corresponds to a number in a ledger or a card catalog. The numbers are usually listed sequentially from smaller to larger, making it easy to locate a particular specimen record. The numbered catalog entry contained the details like the species on the specimen and its locality etc. After years of doing it this way, the advent of computers and printers eventually suggested to me that if you were going to go to the trouble of putting these little number labels on your specimens, it took very little additional work to put the species and locality on the specimen as well as its catalog number.
In addition to the number patch on the specimen it has also been customary to make up some sort of label that is to be kept with the specimen that usually contains at the top of the label the names of the mineral species present on the specimen, its locality the the specimen number and the name of the institution or collector. This has been the time-honored way of cataloging specimens and has much to recommend it, not the least being its simplicity and ease of use. You will see that I have borrowed and refined many of these traditional methods in pursuit of a better way to catalog specimens.
Ideally
How much of what I recommend here you will decide to use for your own cataloging and label making purposes, will, to some extent, depend on your preferences, your pocket book, and to the amount of time you can bring yourself to devote to cataloging your specimens. But whatever you end up doing, doing something is better than doing nothing. Do I need to dwell on the reasons, financial if nothing else, of why you should catalog your collection? I think not. If you have read this far you probably have guiltily come to the conclusion that you should do something or improve the system, if any, you currently use.
Life-Saver Labels
For specimens larger than thumbnail size specimens you should make two different kinds of labels. The first and most important is what I call a life saver label, a small label that you glue right onto the specimen.
The reason that these life saver labels are so important, is that historically it has been shown that labels have a habit of getting separated from their specimens. When this happened the specimen is in jeopardy. The identity of the mineral can always be determined by analysis, but if the label is lost the locality information is often gone forever. The best that can be done in such circumstances is to attribute a locality to the best guess you or someone whose judgment you trust can make. If a specimen falls into the hands of someone that doesn’t know about minerals, the specimen is often regarded as just another rock and after a while it becomes a dirty rock and then a dirty broken rock once the kids play with it for a while, and then it is thrown out. If it has a label on it telling what it is and where it is from, that will often be enough to alert a non-knowledgeable person that it may have some value and be worth preserving. Example: There was one well know mineral collection that was being moved from one institution to another. A janitor/maintenance man was assigned to pack up the collection and he unilaterally decided it would be a lot neater and more efficient if he took all the labels out of the boxes and put them in a separate box before he packed up the collection. There were thousands of specimens of ore samples and specimens from little known or old localities. You can only imagine what a nightmare it was to try and make right this blunder that could never adequately be corrected. Example: look at the Identification forum on Mindat and count up the number of request where people attach pictures of their specimens to their posts and ask “What is this thing and where is it from?” Do you need more examples?
The life saver label takes the place of the little number labels that have been painted or glued onto specimens in former years. This little label, which you can generate on any printer linked to a computer, should have not only the specimen number on it but also at a minimum the locality information. Some of my friends have handwritten these little labels which is not only has the drawback that it is very time consuming, but also, as they get older their unsteady hands can no longer inscribe the tiny letters and numbers necessary, and they have stopped hand writing their labels and switched to computer generated labels or stopped cataloging altogether. So it would appear that computer printing is increasingly the way to go. I would also recommend that you put the species and your name or the name of the institution on the the "life saver" label. Don’t use any print font smaller than 5 points. If you use a smaller type font, many people will need a magnifying glass to read the label. If you can use a minimum of a 6 point font. It is more readable and usually small enough to allow you to put all the information you need on this kind of label.
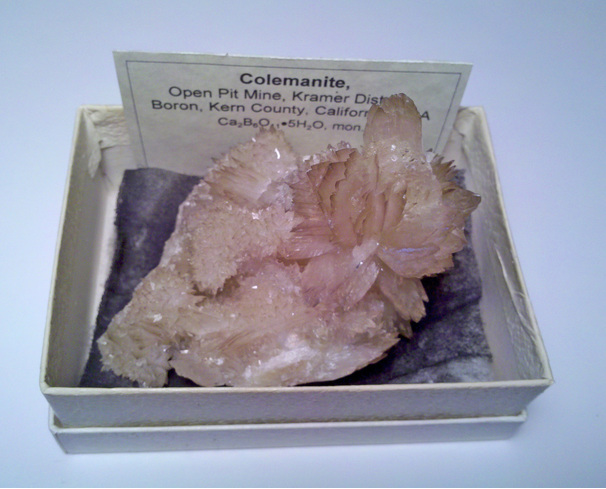
Live Saver label
Life saver label on specimen
The live saver label above is 16mm across. The black on yellow number on the bottom of the Colemanite specimen to the right is typical of the traditional style cataloging. The brass scale below the Colemanite specimen on the right is an inch with a rule at one cm.
Box or Tombstone labels.
You should also make up a box label for your specimen. These are sometimes called tombstone labels because they commonly stand up against one wall of the box like the tombstone at the head of a grave. The reason for this additional label is that most of your specimens will likely be stored in boxes. The species and locality information should be places as high up on the label as you can manage. This makes the information easier to read when the specimens are viewed in their boxes. If this information is placed further down on the label you will usually have to take the label out of the box to read it or at least roll the specimen out of the way a little to be able to see the information. The less you move or touch a specimen, the less damage it will suffer over the years.
You can also place anything else you want, on these labels. I also place the chemical formulas and crystal system information on my label because I was trained as a chemist, and the formulas tell me immediately what kind of minerals I am dealing with and whether they may indicate if need any special handling or not. For example, If they contain U, I know they are radioactive and if they have Cu or Ag I know they contain copper or silver and if they have more than ten or fifteen molecules of H^2O they may be water soluble and or unstable. If you don’t know chemical notation or the abbreviations for the elements, then this information will not mean much to you but others who do know will think it a kindness that you have provided it for them. You might also considering adding information about who you got the specimen from, its measurements, its weight, even a picture of the specimen, or anything unusual about the specimen on the label. What you can place on a label is limited only by the size of the label and the size of the font you are using. Here is an example of a box/tombstone label that I use for my own collection.
Tombstone label
Tombstone label
Tombstone label in box
On the left is a box label as printed. When the back is folded down you can use it as a sandwich board kind of stand alone label and as a tombstone label in a box. I use three somewhat different sizes of these labels to accommodate larger and smaller specimens in various size boxes.
If you are using a modern database-cataloging program, you may be able to print out labels containing all or a subset of the data in the database on a label or report. I choose what information to put on the label and design the label accordingly. Once the label template has been created, printing consists of just pressing a few buttons. It takes more time to cut out the labels than it does to print them.
Display Labels
A display label will be used when a specimen is placed on display somewhere. However the majority of specimens will never be placed on display, but will remain in their boxes. The data on a display label will usually be centered on the label and distributed evenly on the label from top to bottom. In a pinch you can use the box labels for this purpose if you wish.
Display label
What to put on your labels:
You can put anything you want on your labels, but historically it has more or less been agreed that a minimum you should put the name of the species and the locality. If nothing else you should put the locality. You can always analyze the minerals on the specimen to find out what they are, but in most cases there are no tests you can run to determine where the specimen came from.
Species
Sometimes specimens have only one species, such as a single crystal of calcite. Most of the time however, there will be more than one species on the specimen, and sometimes many. You don’t need to put them all on the label, however I would recommend that you put the names of the easily visible species on the label and the name(s) of significant rare species even if they are not easily seen. For those not easily seen it is a kindness to those who come after to also put on the label as well as a note that will direct an interested party to them. For example: Connellite (micro blue prismatic xls.). Usually there will be species on the specimen that you are not sure of, like minerals in the matrix of the specimen. Its better not to guess, just leave them out. You can always put your speculations in the cataloger entry.
Locality
Historically only the name of the major species on the specimen is written on the label and a minimum of locality information, like Chihuahua, Mexico. Ideally however the locality information should be detailed enough for someone to copy it and then go and find the place where the specimen came from. Example: Sérandite, Quebec, Canada. This is not very helpful. Much better would be: Poudrette quarry, Mont Saint Hilaire, Rouville, RCM Montérégie, Québec, Canada. Or perhaps even Poudrette quarry (Demix quarry; Uni-Mix quarry; Desourdy quarry; Carry Mont Saint-Hilaire), Mont Saint Hilaire, Rouville, RCM Montérégie, Québec, Canada. The portion of the label in parentheses are the names that the quarry has had in the past under various owners.
As I have noted before locality information is the most important information that should be associated with a specimen. After the species information which can always be recovered by analysis, the locality information gives a specimen much of its scientific value. Did the sphalerite come from a vein deposit in Colorado or skarn deposit in Siberia? Such information allows scientists and knowledgeable collectors to appreciate the specimen in its geological, mineralogical and geochemical context, determine its paragenesis, make inferences about how it was formed and where similar material may be found elsewhere. Once locality information is separated from the specimen and, God forbid, lost, much of the scientific and often monetary value is gone as well.
Advice about paper, ink, glue, lacquers and printers.
When you make labels you should use paper that is best suited for the purpose. When making box or display labels I would recommend you use a heavy, durable paper like card stock of the acid free or archival kind. If you use a paper that is commonly used for printers, it may not last and will be more prone to yellowing, decomposition, tearing and inadvertent folding. For the little labels you glue right onto your specimens I would also not recommend normal printer paper but a slightly heavier paper. I would recommend something like an 80 pound paper. I use Brilliant White, Astropaque paper. It can’t hurt if the paper is acid free or of archival grade. If you use the normal weight copy paper, when you glue it onto your specimen it will often become somewhat semi-transparent, and that will often make the print more difficult to read than it should be. A somewhat heavier paper will retain more contrast with the black print.
Ensure that the ink your printer uses is not water-soluble. Some of ink-jet printer inks will run and blur if they get wet, at least some of the inks originally used in ink jet printers would do that. The black ink used in most laser printers seems to be of good quality and fairly permanent, although I suspect that we won’t know for sure for at least another 50 or 100 years. Black ink is always recommended because it is usually “carbon black” based and one of the most stable colors.
Colored inks are dye based and prone to fade over time or react with acid or chemicals in the paper. For example we now know that India ink is a good long lasting ink because documents more than 100 years old written with that ink are still very readable.
I would recommend that you use common household white glue to fix the specimen labels to your specimens. If you wish, and it can’t hurt, use an archival quality white glue that is pH neutral. I would recommend that you not use a more permanent glue such as an epoxy glue because they can with time turn yellow and at some time in the future, you or someone else may wish to remove the label and it will be a lot easier to do if you use a water soluble white glue. When you glue your specimen labels onto the specimen, the paper can be a little stiff and not congenial to accommodate itself to the often rough surfaces of most specimens. To overcome this little problem, I would advise making the label wet and this will allow the paper to more easily to conform to the rough surface of the specimens when you press it home. This technique does not work with volatile solvent-based glues like Duco cement. I just put the label on my tongue for a few seconds and this softens up the paper. Then I put a little white glue on the back of the label and gently press it home on a non-prominent spot on the specimen. For heaven’s sake, what ever you do, do not pick out a nice flat space on one of the prominent crystals and glue the label there. I have seen this done on occasion where a volunteer cataloger was told, without any instruction, to put numbers on specimens.
When you have finished gluing the specimen label on the specimen and everything has dried, I would recommend that you cover it with clear fingernail varnish or a clear polyurethane lacquer/paint. Some people cover the label with a thin film of the same glue that they use to glue it to the specimen. The important thing is that after covering the label that when the glue dries that it does not make the labels difficult to read. This will more or less seal the toner into the paper and allow you, when it has dried, to wash your specimen with soap or water or in an ultrasonic cleaner without having to worry too much if the ink will wash out or of the label will separating from the specimen. If you wash the specimen a lot or leave it in water for an extended time, the white glue may dissolve and the label may separate from the specimen in spite of how well you thought you sealed it with lacquer. However for most cleaning purposes, the above method should prevent this from happening.
Exceptions
Some minerals are water-soluble and using a water-soluble white glue may not be suitable. Try and use white glue on a mineral like sulfohalite and you will understand immediately why this will not work very well. In such cases you may need to resort to using a non-water-base glue or just not try and glue labels on such specimens. Many borates are considered to be evaporate minerals even though you can wash many of them with soap and water without harm. You can, however, glue labels onto them with white glue without any problem. In some cases, where you are not sure how the mineral will react to a water-based glue, you will just have to experiment to see what will work.
Very small specimens
Sometimes, if a specimen is very small, gluing any kind of label on the specimen is a challenge or impossible without covering up part or most of the specimen. Sometimes just painting a small number on these specimens may be about as good as you can do, but there is an alternative I have found that works. You can put a tiny drop of glue on the specimen and glue one end of a short length of thread to the specimen. On the other end of the thread glue a little specimen label. Commonly for small specimens, collectors will often fix them on a small base of some kind and or place them in a little plastic box. This is commonly done for micromount and thumbnail specimens. Once they are in a box, you can glue or place the label on or in the box, and all is well.
Thumbnail label type #1
Thumbnail label type #2
Above are two different kinds of labels for thumbnail specimens (often abbreviated to TN). On the left above you can see a thread that has been glued to the little chrysoberyl at one end and to the specimen number label on the other. Instead of using a hole reinforcer as a label, you can just fold a small lifesaver label around the other end of the thread. The TN on the right is in a little plastic box that is known, especially in the western part of the USA as a Perky box, named after Willard Perkin who originally made used them for his own specimens and then popularized and sold them to other thumbnail collectors. In this case the little card stock label slips down between the Styrofoam insert and the back of the base so the label will be displayed against the back wall when the box is closed.
Micromount label as printed
Micromount box with strip labels
Micromount box with label on bottom.
Micromount labels are the hardest to make because the labels have to be made small enough to fit the boxes in which micromount sized specimens are usually stored. On the left is a micromount label just cut out of a printed sheet. To give an idea of the size, the metal scale at the bottom of the first image is an inch long with a mark at one cm. At the top are two label strips that go on the top of the box. The larger bottom part is glued on the bottom of the box. I print these labels on Avery self-adhesive labels so all I have to do is cut them out and press them onto the box. There is some question about how long the stickum on the back of these labels will last before drying out and the label begin to flakes off. A collection of micromounts I bought some years ago used stick-on labels. The collection had survived many, very dry and hot Arizona summers and some of them had begun to flake off the plastic. Avery says it has no data on the longevity of the adhesive on its stick-on labels and an archivist at the Getty Museum in Los Angeles indicated that they don’t have any idea either. Some of these "experts" seem to think that the more modern adhesives used on these stick-on labels have a greater longevity than the earlier ones. I suspect that we won't know the truth about these "modern" adhesives for another few generations.
Historically, micromounters have usually used hand-written labels on their micro-boxes, but as the years pass their writing often becomes harder to read because they are less able to print clearly. Also, even if they are some sort of calligraphic genius, their writing will never be able to match the clarity of printed labels. It would be difficult to write chemical formulas like the one on the right above with that degree of clarity. You can print about twice as many characters on printed labels as you can by hand printing.
If you wish, you can even print a picture of the specimen on the label and almost anything else as well.
Rare species label with image
Rare species label folded
You can also print on the same sheet small specimen labels one of which you can glue onto the specimen. You can take this long, ungainly label and fold it twice and it will look like the one on the right and will serve nicely as a box label.
Notes on labeling rare species.
Often when viewing collection of rare mineral species you will note that there are lots of little paper arrows glued on the specimens. These arrows are presumably pointing to the species of interest on the specimen. Such specimens are sometimes called arrow rocks. The reason for this is that frequently rare species are very non obvious, the crystals small and often present on the specimen in only one to two tiny spots. It is sometimes joked that the species is so rare it isn't even on the specimen. Often these arrows are only pointing in the general direction of the rare species, and even observing the area that the specimen under a microscope, it is often not obvious exactly which mineral it is that the arrow is pointing to. It is good to have these arrows, but make sure that they are pointing as closely as possible to the species of interest, and in addition, make note on the box label and the specimen label if possible just what the arrow is trying to point out. Example: Arrow is pointing to tiny blue crystals. These arrows can be made simply by cutting them out of paper. Some people use a reflective material like tin foil or colored paper. You can glue them on with the same glue as you use to glue on the specimen label. Some people use a tiny bit of "earthquake tack" on the specimen and then press the label down on that to fix it to the specimen.
What I have presented above comes from many years of trial and error and what seemed to be incremental gradual improvement. Although I have tried to include everything here, I am sure that there are many of you who may be able to recommend other or better ways to make labels. If you can suggest improvements, please make your views and experience known, so your ideas can be included here.
Article has been viewed at least 60221 times.